---
url: /guide/asset-versioning.md
---
# Asset versioning
One common challenge when building single-page apps is refreshing site assets when they've been changed. Thankfully, Inertia makes this easy by optionally tracking the current version of your site assets. When an asset changes, Inertia will automatically make a full page visit instead of a XHR visit on the next request.
## Configuration
To enable automatic asset refreshing, you need to tell Inertia the current version of your assets. This can be any arbitrary string (letters, numbers, or a file hash), as long as it changes when your assets have been updated.
```ruby
InertiaRails.configure do |config|
config.version = ViteRuby.digest # or any other versioning method
end
# You can also use lazy evaluation
InertiaRails.configure do |config|
config.version = lambda { ViteRuby.digest }
end
```
## Cache busting
Asset refreshing in Inertia works on the assumption that a hard page visit will trigger your assets to reload. However, Inertia doesn't actually do anything to force this. Typically this is done with some form of cache busting. For example, appending a version query parameter to the end of your asset URLs.
---
---
url: /guide/authentication.md
---
# Authentication
One of the benefits of using Inertia is that you don't need a special authentication system such as OAuth to connect to your data provider (API). Also, since your data is provided via your controllers, and housed on the same domain as your JavaScript components, you don't have to worry about setting up CORS.
Rather, when using Inertia, you can simply use whatever authentication system you like, such as solutions based on Rails' built-in `has_secure_password` method, or gems like [Devise](https://github.com/heartcombo/devise), [Sorcery](https://github.com/Sorcery/sorcery), [Authentication Zero](https://github.com/lazaronixon/authentication-zero), etc.
---
---
url: /guide/authorization.md
---
# Authorization
When using Inertia, authorization is best handled server-side in your application's authorization policies. However, you may be wondering how to perform checks against your authorization policies from within your Inertia page components since you won't have access to your framework's server-side helpers.
The simplest approach to solving this problem is to pass the results of your authorization checks as props to your page components.
Here's an example of how you might do this in a Rails controller using the [Action Policy](https://github.com/palkan/action_policy) gem:
```ruby
class UsersController < ApplicationController
def index
render inertia: 'Users/Index', props: {
can: {
create_user: allowed_to?(:create, User)
},
users: User.all.map do |user|
user.as_json(
only: [:id, :first_name, :last_name, :email]
).merge(
can: {
edit_user: allowed_to?(:edit, user)
}
)
end
}
end
end
```
---
---
url: /awesome.md
---
# Awesome Inertia Rails
## Community and social media
* [X.com](https://x.com/inertiajs) - Official X account.
* [Discord](https://discord.gg/inertiajs) - Official Discord server.
* [Reddit](https://www.reddit.com/r/inertiajs) - Inertia.js subreddit.
## Starter kits
* [Inertia Rails Starter Kit](https://github.com/skryukov/inertia-rails-shadcn-starter) - A starter kit based on the [Laravel Starter Kit](https://github.com/laravel/react-starter-kit) (React, shadcn/ui).
* [Kaze](https://github.com/gtkvn/kaze) - Rails authentication scaffolding (Hotwire/React/Vue).
* [Svelte starter template](https://github.com/georgekettle/rails_svelte) - (Svelte, shadcn/ui).
## Real-world applications
* [Code Basics](https://code-basics.com) — Free online programming courses. **Code available on [GitHub](https://github.com/hexlet-basics/hexlet-basics)**.
* [Crevio](https://crevio.co) — All-In-One creator store.
* [Hardcover](https://hardcover.app) — A social network for book lovers.
* [Clipflow](https://www.clipflow.co) — Project Management for Content Creators.
* [Switch Kanban](https://switchkanban.com.br) — Project management tool for Software Houses.
## Demo applications
* [Ruby on Rails/Vue](https://github.com/ledermann/pingcrm) by Georg Ledermann.
* [Ruby on Rails/Vue SSR/Vite](https://github.com/ElMassimo/pingcrm-vite) by Máximo Mussini.
## Packages
### Inertia-specific
* [Inertia X](https://github.com/buhrmi/inertiax) – Svelte-only fork of Inertia with additional features (Svelte).
* [useInertiaForm](https://github.com/aviemet/useInertiaForm) – direct replacement of Inertia's useForm hook with support for nested forms (React).
* [Inertia Modal](https://github.com/inertiaui/modal) – open any route in a Modal or Slideover without having to change anything about your existing routes or controllers (React, Vue).
### General
* [JsRoutes](https://github.com/railsware/js-routes) – Brings Rails named routes to JavaScript.
* [JS From Routes](https://github.com/ElMassimo/js_from_routes) – Generate path helpers and API methods from your Rails routes.
* [Typelizer](https://github.com/skryukov/typelizer) – A TypeScript type generator for Ruby serializers.
* [types\_from\_serializers](https://github.com/ElMassimo/types_from_serializers) – Generate TypeScript interfaces from your JSON serializers.
## Articles
* [Building Filters with Inertia.js and Rails: A Clean Approach](https://pedro.switchdreams.com.br/inertiajs/2025/06/03/filters-with-inertia-and-rails/) by Pedro Duarte (2025).
* [Inertial Rails project setup to use code generated from v0 (ShadcnUI, TailwindCSS4, React, TypeScript) and deploy with Kamal](https://tuyenhx.com/blog/inertia-rails-shadcn-typescript-ssr-en/) by Tom Ho (2025).
* [How We Fell Out of Love with Next.js and Back in Love with Ruby on Rails & Inertia.js](https://hardcover.app/blog/part-1-how-we-fell-out-of-love-with-next-js-and-back-in-love-with-ruby-on-rails-inertia-js) by Adam Fortuna (2025).
* [How to Handle Bundle Size in Inertia.js](https://pedro.switchdreams.com.br/inertiajs/2025/03/21/handle-bundle-size-inertiajs) by Pedro Duarte (2025).
* [Building an InertiaJS app with Rails](https://avohq.io/blog/inertia-js-with-rails) by Exequiel Rozas (2025).
* [How to Build a Twitter Clone with Rails 8 Inertia and React](https://robrace.dev/blog/build-a-twitter-clone-with-rails-inertia-and-react) by Rob Race (2025).
* [Keeping Rails cool: the modern frontend toolkit](https://evilmartians.com/chronicles/keeping-rails-cool-the-modern-frontend-toolkit) by Irina Nazarova (2024).
* [Inertia.js in Rails: a new era of effortless integration](https://evilmartians.com/chronicles/inertiajs-in-rails-a-new-era-of-effortless-integration) by Svyatoslav Kryukov (2024).
## Other
* [Inertia.js devtools](https://chromewebstore.google.com/detail/inertiajs-devtools/golilfffgehhabacoaoilfgjelagablo?hl=en) - Inertia.js page json in devtools panel.
## Videos
* [Ken Greeff's YouTube channel](https://www.youtube.com/@kengreeff/search?query=inertia) — fresh Inertia Rails content (2025).
* [InertiaJS on Rails](https://www.youtube.com/watch?v=03EjkPaCHEI\&list=PLRxuhjCzzcWj4MUjDCC9TCP_ZfcRL0I1s) – YouTube course by Brandon Shar (2021).
## Talks
* [Tropical on Rails 2025: Defying Front-End Inertia](https://www.youtube.com/watch?v=uLFItMoF_wA) by Svyatoslav Kryukov (2025).
* [RailsConf 2021: Inertia.js on Rails Lightning Talk](https://www.youtube.com/watch?v=-JT1RF-IhKs) by Brandon Shar (2021).
*Please share your projects and resources with us!*
---
---
url: /guide/client-side-setup.md
---
# Client-side setup
Once you have your [server-side framework configured](/guide/server-side-setup.md), you then need to setup your client-side framework. Inertia currently provides support for React, Vue, and Svelte.
> \[!NOTE]
> You can skip this step if you have already executed the [Rails generator](/guide/server-side-setup#rails-generator).
## Install dependencies
First, install the Inertia client-side adapter corresponding to your framework of choice.
:::tabs key:frameworks
\== Vue
```shell
npm install @inertiajs/vue3 vue
```
\== React
```shell
npm install @inertiajs/react react react-dom
```
\== Svelte 4|Svelte 5
```shell
npm install @inertiajs/svelte svelte
```
:::
## Initialize the Inertia app
Next, update your main JavaScript file to boot your Inertia app. To accomplish this, we'll initialize the client-side framework with the base Inertia component.
:::tabs key:frameworks
\== Vue
```js
// frontend/entrypoints/inertia.js
import { createApp, h } from 'vue'
import { createInertiaApp } from '@inertiajs/vue3'
createInertiaApp({
resolve: (name) => {
const pages = import.meta.glob('../pages/**/*.vue', { eager: true })
return pages[`../pages/${name}.vue`]
},
setup({ el, App, props, plugin }) {
createApp({ render: () => h(App, props) })
.use(plugin)
.mount(el)
},
})
```
\== React
```js
// frontend/entrypoints/inertia.js
import { createInertiaApp } from '@inertiajs/react'
import { createElement } from 'react'
import { createRoot } from 'react-dom/client'
createInertiaApp({
resolve: (name) => {
const pages = import.meta.glob('../pages/**/*.jsx', { eager: true })
return pages[`../pages/${name}.jsx`]
},
setup({ el, App, props }) {
const root = createRoot(el)
root.render(createElement(App, props))
},
})
```
\== Svelte 4
```js
// frontend/entrypoints/inertia.js
import { createInertiaApp } from '@inertiajs/svelte'
createInertiaApp({
resolve: (name) => {
const pages = import.meta.glob('../pages/**/*.svelte', { eager: true })
return pages[`../pages/${name}.svelte`]
},
setup({ el, App, props }) {
new App({ target: el, props })
},
})
```
\== Svelte 5
```js
// frontend/entrypoints/inertia.js
import { createInertiaApp } from '@inertiajs/svelte'
import { mount } from 'svelte'
createInertiaApp({
resolve: (name) => {
const pages = import.meta.glob('./Pages/**/*.svelte', { eager: true })
return pages[`./Pages/${name}.svelte`]
},
setup({ el, App, props }) {
mount(App, { target: el, props })
},
})
```
:::
The `setup` callback receives everything necessary to initialize the client-side framework, including the root Inertia `App` component.
# Resolving components
The `resolve` callback tells Inertia how to load a page component. It receives a page name (string), and returns a page component module. How you implement this callback depends on which bundler (Vite or Webpack) you're using.
:::tabs key:frameworks
\== Vue
```js
// Vite
// frontend/entrypoints/inertia.js
createInertiaApp({
resolve: (name) => {
const pages = import.meta.glob('../pages/**/*.vue', { eager: true })
return pages[`../pages/${name}.vue`]
},
// ...
})
// Webpacker/Shakapacker
// javascript/packs/inertia.js
createInertiaApp({
resolve: (name) => require(`../pages/${name}`),
// ...
})
```
\== React
```js
// Vite
// frontend/entrypoints/inertia.js
createInertiaApp({
resolve: (name) => {
const pages = import.meta.glob('../pages/**/*.jsx', { eager: true })
return pages[`../pages/${name}.jsx`]
},
//...
})
// Webpacker/Shakapacker
// javascript/packs/inertia.js
createInertiaApp({
resolve: (name) => require(`../pages/${name}`),
//...
})
```
\== Svelte 4|Svelte 5
```js
// Vite
// frontend/entrypoints/inertia.js
createInertiaApp({
resolve: (name) => {
const pages = import.meta.glob('../pages/**/*.svelte', { eager: true })
return pages[`../pages/${name}.svelte`]
},
//...
})
// Webpacker/Shakapacker
// javascript/packs/inertia.js
createInertiaApp({
resolve: (name) => require(`../pages/${name}.svelte`),
//...
})
```
:::
By default we recommend eager loading your components, which will result in a single JavaScript bundle. However, if you'd like to lazy-load your components, see our [code splitting](/guide/code-splitting.md) documentation.
## Defining a root element
By default, Inertia assumes that your application's root template has a root element with an `id` of `app`. If your application's root element has a different `id`, you can provide it using the `id` property.
```js
createInertiaApp({
id: 'my-app',
// ...
})
```
---
---
url: /guide/code-splitting.md
---
# Code splitting
Code splitting breaks apart the various pages of your application into smaller bundles, which are then loaded on demand when visiting new pages. This can significantly reduce the size of the initial JavaScript bundle loaded by the browser, improving the time to first render.
While code splitting is helpful for very large projects, it does require extra requests when visiting new pages. Generally speaking, if you're able to use a single bundle, your app is going to feel snappier.
To enable code splitting you'll need to tweak the resolve callback in your `createInertiaApp()` configuration, and how you do this is different depending on which bundler you're using.
## Using Vite
Vite enables code splitting (or lazy-loading as they call it) by default when using their `import.meta.glob()` function, so simply omit the `{ eager: true }` option, or set it to false, to disable eager loading.
:::tabs key:frameworks
\== Vue
```js
// frontend/entrypoints/inertia.js
createInertiaApp({
resolve: (name) => {
const pages = import.meta.glob('../pages/**/*.vue', { eager: true }) // [!code --]
return pages[`../pages/${name}.vue`] // [!code --]
const pages = import.meta.glob('../pages/**/*.vue') // [!code ++]
return pages[`../pages/${name}.vue`]() // [!code ++]
},
//...
})
```
\== React
```js
// frontend/entrypoints/inertia.js
createInertiaApp({
resolve: (name) => {
const pages = import.meta.glob('../pages/**/*.jsx', { eager: true }) // [!code --]
return pages[`../pages/${name}.jsx`] // [!code --]
const pages = import.meta.glob('../pages/**/*.jsx') // [!code ++]
return pages[`../pages/${name}.jsx`]() // [!code ++]
},
//...
})
```
\== Svelte 4|Svelte 5
```js
// frontend/entrypoints/inertia.js
createInertiaApp({
resolve: (name) => {
const pages = import.meta.glob('../pages/**/*.svelte', { eager: true }) // [!code --]
return pages[`../pages/${name}.svelte`] // [!code --]
const pages = import.meta.glob('../pages/**/*.svelte') // [!code ++]
return pages[`../pages/${name}.svelte`]() // [!code ++]
},
//...
})
```
:::
## Using Webpacker/Shakapacker
> \[!WARNING]
> We recommend using [Vite Ruby](https://vite-ruby.netlify.app) for new projects.
To use code splitting with Webpack, you will first need to enable [dynamic imports](https://github.com/tc39/proposal-dynamic-import) via a Babel plugin. Let's install it now.
```shell
npm install @babel/plugin-syntax-dynamic-import
```
Next, create a `.babelrc` file in your project with the following configuration:
```json
{
"plugins": ["@babel/plugin-syntax-dynamic-import"]
}
```
Finally, update the `resolve` callback in your app's initialization code to use `import` instead of `require`.
:::tabs key:frameworks
\== Vue
```js
// javascript/packs/inertia.js
createInertiaApp({
resolve: (name) => require(`../pages/${name}`), // [!code ii]
resolve: (name) => import(`../pages/${name}`), // [!code ++]
//...
})
```
\== React
```js
// javascript/packs/inertia.js
createInertiaApp({
resolve: (name) => require(`../pages/${name}`), // [!code ii]
resolve: (name) => import(`../pages/${name}`), // [!code ++]
//...
})
```
\== Svelte 4|Svelte 5
```js
// javascript/packs/inertia.js
createInertiaApp({
resolve: (name) => require(`../pages/${name}.svelte`), // [!code ii]
resolve: (name) => import(`../pages/${name}.svelte`), // [!code ++]
//...
})
```
:::
You should also consider using cache busting to force browsers to load the latest version of your assets. To accomplish this, add the following configuration to your webpack configuration file.
```js
// webpack.config.js
module.exports = {
//...
output: {
//...
chunkFilename: 'js/[name].js?id=[chunkhash]',
},
}
```
---
---
url: /guide/configuration.md
---
# Configuration
Inertia Rails can be configured globally or in a specific controller (and subclasses).
## Global Configuration
If using global configuration, we recommend you place the code inside an initializer:
```ruby
# config/initializers/inertia.rb
InertiaRails.configure do |config|
# Example: force a full-reload if the deployed assets change.
config.version = ViteRuby.digest
end
```
The default configuration can be found [here](https://github.com/inertiajs/inertia-rails/blob/master/lib/inertia_rails/configuration.rb#L5).
## Local Configuration
Use `inertia_config` in your controllers to override global settings:
```ruby
class EventsController < ApplicationController
inertia_config(
version: "events-#{InertiaRails.configuration.version}",
ssr_enabled: -> { action_name == "index" },
)
end
```
## Setting Configuration via Environment Variables
Inertia Rails supports setting any configuration option via environment variables out of the box. For each option in the configuration, you can set an environment variable prefixed with `INERTIA_` and the option name in uppercase. For example: `INERTIA_SSR_ENABLED`.
**Boolean values** (like `INERTIA_DEEP_MERGE_SHARED_DATA` or `INERTIA_SSR_ENABLED`) are parsed from the strings `"true"` or `"false"` (case-sensitive).
## Configuration Options
### `component_path_resolver`
**Default**: `->(path:, action:) { "#{path}/#{action}" }`
Use `component_path_resolver` to customize component path resolution when [`default_render`](#default_render) config value is set to `true`. The value should be callable and will receive the `path` and `action` parameters, returning a string component path. See [Automatically determine component name](/guide/responses#automatically-determine-component-name).
### `deep_merge_shared_data`
**Default**: `false`\
**ENV**: `INERTIA_DEEP_MERGE_SHARED_DATA`
When enabled, props will be deep merged with shared data, combining hashes
with the same keys instead of replacing them.
### `default_render`
**Default**: `false`\
**ENV**: `INERTIA_DEFAULT_RENDER`
Overrides Rails default rendering behavior to render using Inertia by default.
### `encrypt_history`
**Default**: `false`\
**ENV**: `INERTIA_ENCRYPT_HISTORY`
When enabled, you instruct Inertia to encrypt your app's history, it uses
the browser's built-in [`crypto` api](https://developer.mozilla.org/en-US/docs/Web/API/Crypto)
to encrypt the current page's data before pushing it to the history state.
### `ssr_enabled` *(experimental)*
**Default**: `false`\
**ENV**: `INERTIA_SSR_ENABLED`
Whether to use a JavaScript server to pre-render your JavaScript pages,
allowing your visitors to receive fully rendered HTML when they first visit
your application.
Requires a JS server to be available at `ssr_url`. [*Example*](https://github.com/ElMassimo/inertia-rails-ssr-template)
### `ssr_url` *(experimental)*
**Default**: `"http://localhost:13714"`
**ENV**: `INERTIA_SSR_URL`
The URL of the JS server that will pre-render the app using the specified
component and props.
### `version` *(recommended)*
**Default**: `nil`
**ENV**: `INERTIA_VERSION`
This allows Inertia to detect if the app running in the client is oudated,
forcing a full page visit instead of an XHR visit on the next request.
See [assets versioning](/guide/asset-versioning).
### `parent_controller`
**Default**: `'::ApplicationController'`
**ENV**: `INERTIA_PARENT_CONTROLLER`
Specifies the base controller class for the internal `StaticController` used to render [Shorthand routes](/guide/routing#shorthand-routes).
By default, Inertia Rails creates a `StaticController` that inherits from `ApplicationController`. You can use this option to specify a different base controller (for example, to include custom authentication, layout, or before actions).
---
---
url: /guide/csrf-protection.md
---
# CSRF protection
## Making requests
Inertia's Rails adapter automatically includes the proper CSRF token when making requests via Inertia or Axios. Therefore, **no additional configuration is required**.
However, if you need to handle CSRF protection manually, one approach is to include the CSRF token as a prop on every response. You can then use the token when making Inertia requests.
:::tabs key:frameworks
\== Vue
```js
import { router, usePage } from '@inertiajs/vue3'
const page = usePage()
router.post('/users', {
_token: page.props.csrf_token,
name: 'John Doe',
email: 'john.doe@example.com',
})
```
\== React
```js
import { router, usePage } from '@inertiajs/react'
const props = usePage().props
router.post('/users', {
_token: props.csrf_token,
name: 'John Doe',
email: 'john.doe@example.com',
})
```
\== Svelte 4|Svelte 5
```js
import { page, router } from '@inertiajs/svelte'
router.post('/users', {
_token: $page.props.csrf_token,
name: 'John Doe',
email: 'john.doe@example.com',
})
```
:::
You can even use Inertia's [shared data](/guide/shared-data.md) functionality to automatically include the `csrf_token` with each response.
However, a better approach is to use the CSRF functionality already built into [axios](https://github.com/axios/axios) for this. Axios is the HTTP library that Inertia uses under the hood.
Axios automatically checks for the existence of an `XSRF-TOKEN` cookie. If it's present, it will then include the token in an `X-XSRF-TOKEN` header for any requests it makes.
The easiest way to implement this is using server-side middleware. Simply include the `XSRF-TOKEN` cookie on each response, and then verify the token using the `X-XSRF-TOKEN` header sent in the requests from axios. (That's basically what `inertia_rails` does).
> \[!NOTE]
>
> `X-XSRF-TOKEN` header only works for [Inertia requests](/guide/the-protocol#inertia-responses). If you want to send a normal request you can use `X-CSRF-TOKEN` instead.
## Handling mismatches
When a CSRF token mismatch occurs, Rails raises the `ActionController::InvalidAuthenticityToken` error. Since that isn't a valid Inertia response, the error is shown in a modal.
Obviously, this isn't a great user experience. A better way to handle these errors is to return a redirect back to the previous page, along with a flash message that the page expired. This will result in a valid Inertia response with the flash message available as a prop which you can then display to the user. Of course, you'll need to share your [flash messages](/guide/shared-data.md#flash-messages) with Inertia for this to work.
You may modify your application's exception handler to automatically redirect the user back to the page they were previously on while flashing a message to the session. To accomplish this, you may use the `rescue_from` method in your `ApplicationController`.
```ruby
class ApplicationController < ActionController::Base
rescue_from ActionController::InvalidAuthenticityToken, with: :inertia_page_expired_error
inertia_share flash: -> { flash.to_hash }
private
def inertia_page_expired_error
redirect_back_or_to('/', allow_other_host: false, notice: "The page expired, please try again.")
end
end
```
The end result is a much better experience for your users. Instead of seeing the error modal, the user is instead presented with a message that the page "expired" and are asked to try again.
---
---
url: /guide/deferred-props.md
---
# Deferred props
Inertia's deferred props feature allows you to defer the loading of certain page data until after the initial page render. This can be useful for improving the perceived performance of your app by allowing the initial page render to happen as quickly as possible.
## Server side
To defer a prop, you can use the defer method when returning your response. This method receives a callback that returns the prop data. The callback will be executed in a separate request after the initial page render.
```ruby
class UsersController < ApplicationController
def index
render inertia: 'Users/Index', props: {
users: -> { User.all },
roles: -> { Role.all },
permissions: InertiaRails.defer { Permission.all },
}
end
end
```
### Grouping requests
By default, all deferred props get fetched in one request after the initial page is rendered, but you can choose to fetch data in parallel by grouping props together.
```ruby
class UsersController < ApplicationController
def index
render inertia: 'Users/Index', props: {
users: -> { User.all },
roles: -> { Role.all },
permissions: InertiaRails.defer { Permission.all },
teams: InertiaRails.defer(group: 'attributes') { Team.all },
projects: InertiaRails.defer(group: 'attributes') { Project.all },
tasks: InertiaRails.defer(group: 'attributes') { Task.all },
}
end
end
```
In the example above, the `teams`, `projects`, and `tasks` props will be fetched in one request, while the `permissions` prop will be fetched in a separate request in parallel. Group names are arbitrary strings and can be anything you choose.
## Client side
On the client side, Inertia provides the `Deferred` component to help you manage deferred props. This component will automatically wait for the specified deferred props to be available before rendering its children.
:::tabs key:frameworks
\== Vue
```vue
{/snippet}
{#each permissions as permission}
{/each}
```
:::
If you need to wait for multiple deferred props to become available, you can specify an array to the `data` prop.
:::tabs key:frameworks
\== Vue
```vue
{/snippet}
```
:::
---
---
url: /guide/demo-application.md
---
# Demo application
We've setup a demo app for Inertia.js called [Ping CRM](https://demo.inertiajs.com/login). This application is built using Laravel and Vue. You can find the source code on [GitHub](https://github.com/inertiajs/pingcrm).
> \[!NOTE]
> The Ping CRM demo is hosted on Heroku and the database is reset every hour. Please be respectful when editing data.
[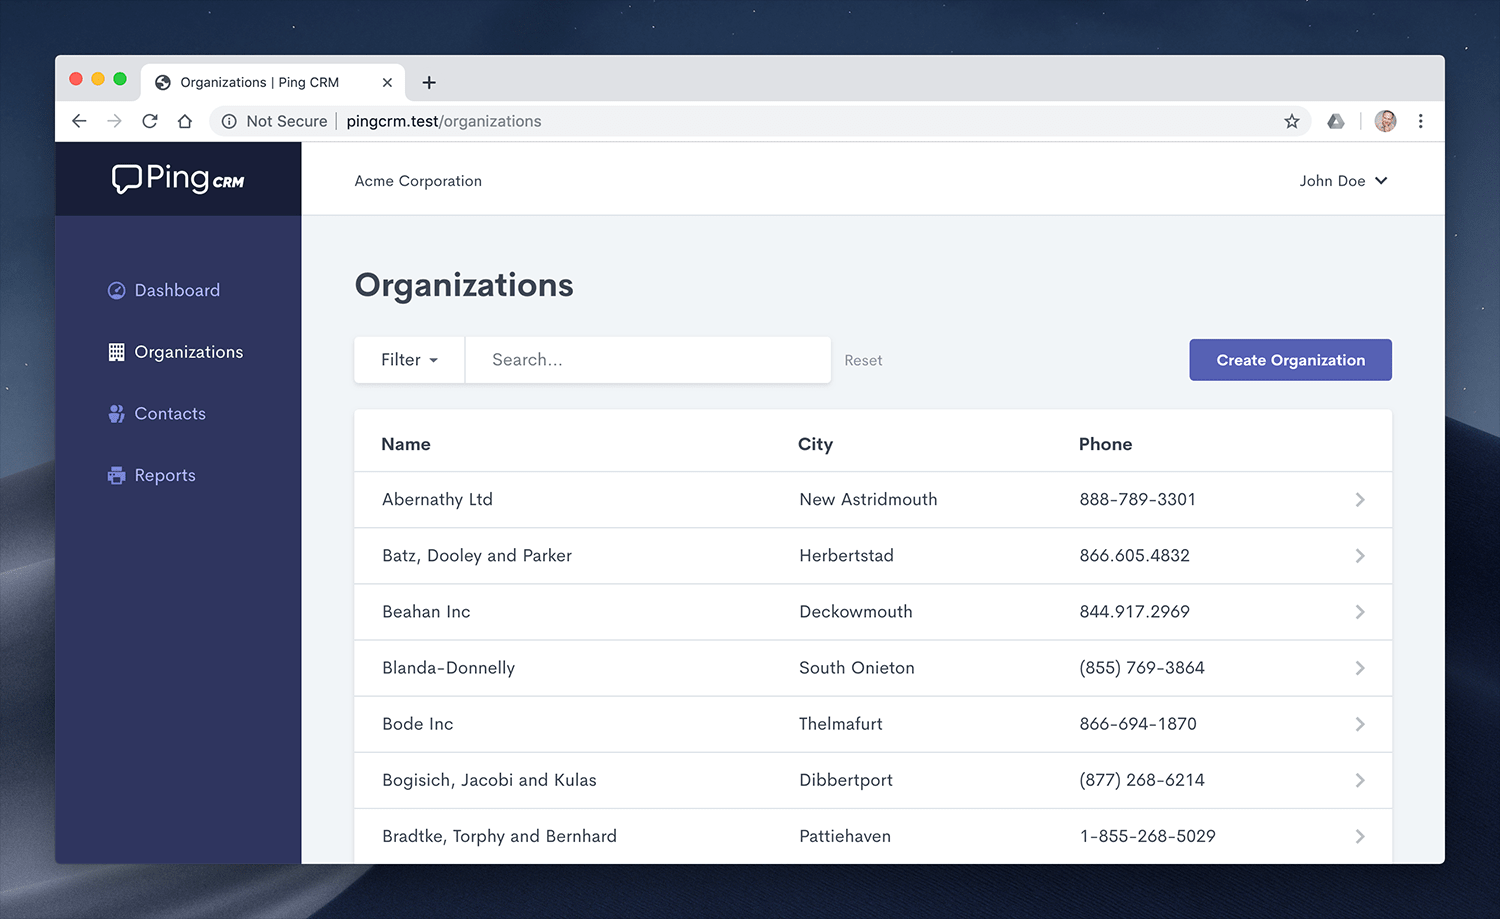](https://demo.inertiajs.com/login)
In addition to the Vue version of Ping CRM, we also maintain a Svelte version of the application, which you can find [on GitHub](https://github.com/inertiajs/pingcrm-svelte).
## Third party
Beyond our official demo app, Ping CRM has also been translated into numerous different languages and frameworks.
* [Ruby on Rails/Vue](https://github.com/ledermann/pingcrm) by Georg Ledermann
* [Ruby on Rails/Vue SSR/Vite](https://github.com/ElMassimo/pingcrm-vite) by Máximo Mussini
* [Laravel/React](https://github.com/Landish/pingcrm-react) by Lado Lomidze
* [Laravel/Svelte](https://github.com/zgabievi/pingcrm-svelte) by Zura G]abievi
* [Laravel/Mithril.js](https://github.com/tbreuss/pingcrm-mithril) by Thomas Breuss
* [Yii 2/Vue](https://github.com/tbreuss/pingcrm-yii2) by Thomas Breuss
* [Symfony/Vue](https://github.com/aleksblendwerk/pingcrm-symfony) by Aleks Seltenreich
* [Clojure/React](https://github.com/prestancedesign/pingcrm-clojure) by Michaël Salihi
---
---
url: /guide/error-handling.md
---
# Error handling
## Development
One of the advantages to working with a robust server-side framework is the built-in exception handling you get for free. The challenge is, if you're making an XHR request (which Inertia does) and you hit a server-side error, you're typically left digging through the network tab in your browser's devtools to diagnose the problem.
Inertia solves this issue by showing all non-Inertia responses in a modal. This means you get the same beautiful error-reporting you're accustomed to, even though you've made that request over XHR.
## Production
In production you will want to return a proper Inertia error response instead of relying on the modal-driven error reporting that is present during development. To accomplish this, you'll need to update your framework's default exception handler to return a custom error page.
When building Rails applications, you can accomplish this by using the `rescue_from` method in your `ApplicationController`.
```ruby
class ApplicationController < ActionController::Base
rescue_from StandardError, with: :inertia_error_page
private
def inertia_error_page(exception)
raise exception if Rails.env.local?
status = ActionDispatch::ExceptionWrapper.new(nil, exception).status_code
render inertia: 'ErrorPage', props: { status: }, status:
end
end
```
You may have noticed we're returning an `ErrorPage` page component in the example above. You'll need to actually create this component, which will serve as the generic error page for your application. Here's an example error component you can use as a starting point.
:::tabs key:frameworks
\== Vue
```vue
{{ status }}: {{ title }}
{{ description }}
```
\== React
```jsx
export default function ErrorPage({ status }) {
const title =
{
503: 'Service Unavailable',
500: 'Server Error',
404: 'Page Not Found',
403: 'Forbidden',
}[status] || 'Unexpected error'
const description = {
503: 'Sorry, we are doing some maintenance. Please check back soon.',
500: 'Whoops, something went wrong on our servers.',
404: 'Sorry, the page you are looking for could not be found.',
403: 'Sorry, you are forbidden from accessing this page.',
}[status]
return (
{status}: {title}
{description}
)
}
```
\== Svelte 4
```svelte
{status}: {title}
{description}
```
\== Svelte 5
```svelte
{titles[status]}
{description[status]}
```
:::
---
---
url: /guide/events.md
---
# Events
Inertia provides an event system that allows you to "hook into" the various lifecycle events of the library.
## Registering listeners
To register an event listener, use the `router.on()` method.
:::tabs key:frameworks
\== Vue
```js
import { router } from '@inertiajs/vue3'
router.on('start', (event) => {
console.log(`Starting a visit to ${event.detail.visit.url}`)
})
```
\== React
```jsx
import { router } from '@inertiajs/react'
router.on('start', (event) => {
console.log(`Starting a visit to ${event.detail.visit.url}`)
})
```
\== Svelte 4|Svelte 5
```js
import { router } from '@inertiajs/svelte'
router.on('start', (event) => {
console.log(`Starting a visit to ${event.detail.visit.url}`)
})
```
:::
Under the hood, Inertia uses native browser events, so you can also interact with Inertia events using the typical event methods you may already be familiar with - just be sure to prepend `inertia:` to the event name.
:::tabs key:frameworks
\== Vue
```js
import { router } from '@inertiajs/vue3'
document.addEventListener('inertia:start', (event) => {
console.log(`Starting a visit to ${event.detail.visit.url}`)
})
```
\== React
```jsx
import { router } from '@inertiajs/react'
document.addEventListener('inertia:start', (event) => {
console.log(`Starting a visit to ${event.detail.visit.url}`)
})
```
\== Svelte 4|Svelte 5
```js
import { router } from '@inertiajs/svelte'
document.addEventListener('inertia:start', (event) => {
console.log(`Starting a visit to ${event.detail.visit.url}`)
})
```
:::
## Removing listeners
When you register an event listener, Inertia automatically returns a callback that can be invoked to remove the event listener.
:::tabs key:frameworks
\== Vue
```js
import { router } from '@inertiajs/vue3'
let removeStartEventListener = router.on('start', (event) => {
console.log(`Starting a visit to ${event.detail.visit.url}`)
})
// Remove the listener...
removeStartEventListener()
```
\== React
```jsx
import { router } from '@inertiajs/react'
let removeStartEventListener = router.on('start', (event) => {
console.log(`Starting a visit to ${event.detail.visit.url}`)
})
// Remove the listener...
removeStartEventListener()
```
\== Svelte 4|Svelte 5
```js
import { router } from '@inertiajs/svelte'
let removeStartEventListener = router.on('start', (event) => {
console.log(`Starting a visit to ${event.detail.visit.url}`)
})
// Remove the listener...
removeStartEventListener()
```
:::
Combined with hooks, you can automatically remove the event listener when components unmount.
:::tabs key:frameworks
\== Vue
```js
import { router } from '@inertiajs/vue3'
import { onUnmounted } from 'vue'
onUnmounted(
router.on('start', (event) => {
console.log(`Starting a visit to ${event.detail.visit.url}`)
}),
)
```
\== React
```jsx
import { router } from '@inertiajs/react'
import { useEffect } from 'react'
useEffect(() => {
return router.on('start', (event) => {
console.log(`Starting a visit to ${event.detail.visit.url}`)
})
}, [])
```
\== Svelte 4
```js
import { router } from '@inertiajs/svelte'
import { onMount } from 'svelte'
onMount(() => {
return router.on('start', (event) => {
console.log(`Starting a visit to ${event.detail.visit.url}`)
})
})
```
\== Svelte 5
```js
import { router } from '@inertiajs/svelte'
$effect(() => {
return router.on('start', (event) => {
console.log(`Starting a visit to ${event.detail.visit.url}`)
})
})
```
:::
Alternatively, if you're using native browser events, you can remove the event listener using `removeEventListener()`.
:::tabs key:frameworks
\== Vue
```js
import { router } from '@inertiajs/vue3'
let startEventListener = (event) => {
console.log(`Starting a visit to ${event.detail.visit.url}`)
}
document.addEventListener('inertia:start', startEventListener)
// Remove the listener...
document.removeEventListener('inertia:start', startEventListener)
```
\== React
```jsx
import { router } from '@inertiajs/react'
let startEventListener = (event) => {
console.log(`Starting a visit to ${event.detail.visit.url}`)
}
document.addEventListener('inertia:start', startEventListener)
// Remove the listener...
document.removeEventListener('inertia:start', startEventListener)
```
\== Svelte 4|Svelte 5
```js
import { router } from '@inertiajs/svelte'
let startEventListener = (event) => {
console.log(`Starting a visit to ${event.detail.visit.url}`)
}
document.addEventListener('inertia:start', startEventListener)
// Remove the listener...
document.removeEventListener('inertia:start', startEventListener)
```
:::
## Cancelling events
Some events, such as `before`, `invalid`, and `error`, support cancellation, allowing you to prevent Inertia's default behavior. Just like native events, the event will be cancelled if only one event listener calls `event.preventDefault()`.
:::tabs key:frameworks
\== Vue
```js
import { router } from '@inertiajs/vue3'
router.on('before', (event) => {
if (!confirm('Are you sure you want to navigate away?')) {
event.preventDefault()
}
})
```
\== React
```jsx
import { router } from '@inertiajs/react'
router.on('before', (event) => {
if (!confirm('Are you sure you want to navigate away?')) {
event.preventDefault()
}
})
```
\== Svelte 4|Svelte 5
```js
import { router } from '@inertiajs/svelte'
router.on('before', (event) => {
if (!confirm('Are you sure you want to navigate away?')) {
event.preventDefault()
}
})
```
:::
For convenience, if you register your event listener using `router.on()`, you can cancel the event by returning `false` from the listener.
:::tabs key:frameworks
\== Vue
```js
import { router } from '@inertiajs/vue3'
router.on('before', (event) => {
return confirm('Are you sure you want to navigate away?')
})
```
\== React
```jsx
import { router } from '@inertiajs/react'
router.on('before', (event) => {
return confirm('Are you sure you want to navigate away?')
})
```
\== Svelte 4|Svelte 5
```js
import { router } from '@inertiajs/svelte'
router.on('before', (event) => {
return confirm('Are you sure you want to navigate away?')
})
```
:::
Note, browsers do not allow cancelling the native `popstate` event, so preventing forward and back history visits while using Inertia.js is not possible.
## Before
The `before` event fires when a request is about to be made to the server. This is useful for intercepting visits.
:::tabs key:frameworks
\== Vue
```js
import { router } from '@inertiajs/vue3'
router.on('before', (event) => {
console.log(`About to make a visit to ${event.detail.visit.url}`)
})
```
\== React
```jsx
import { router } from '@inertiajs/react'
router.on('before', (event) => {
console.log(`About to make a visit to ${event.detail.visit.url}`)
})
```
\== Svelte 4|Svelte 5
```js
import { router } from '@inertiajs/svelte'
router.on('before', (event) => {
console.log(`About to make a visit to ${event.detail.visit.url}`)
})
```
:::
The primary purpose of this event is to allow you to prevent a visit from happening.
:::tabs key:frameworks
\== Vue
```js
import { router } from '@inertiajs/vue3'
router.on('before', (event) => {
return confirm('Are you sure you want to navigate away?')
})
```
\== React
```jsx
import { router } from '@inertiajs/react'
router.on('before', (event) => {
return confirm('Are you sure you want to navigate away?')
})
```
\== Svelte 4|Svelte 5
```js
import { router } from '@inertiajs/svelte'
router.on('before', (event) => {
return confirm('Are you sure you want to navigate away?')
})
```
:::
## Start
The `start` event fires when a request to the server has started. This is useful for displaying loading indicators.
:::tabs key:frameworks
\== Vue
```js
import { router } from '@inertiajs/vue3'
router.on('start', (event) => {
console.log(`Starting a visit to ${event.detail.visit.url}`)
})
```
\== React
```jsx
import { router } from '@inertiajs/react'
router.on('start', (event) => {
console.log(`Starting a visit to ${event.detail.visit.url}`)
})
```
\== Svelte 4|Svelte 5
```js
import { router } from '@inertiajs/svelte'
router.on('start', (event) => {
console.log(`Starting a visit to ${event.detail.visit.url}`)
})
```
:::
The `start` event is not cancelable.
## Progress
The `progress` event fires as progress increments during file uploads.
:::tabs key:frameworks
\== Vue
```js
import { router } from '@inertiajs/vue3'
router.on('progress', (event) => {
this.form.progress = event.detail.progress.percentage
})
```
\== React
```jsx
import { router } from '@inertiajs/react'
router.on('progress', (event) => {
this.form.progress = event.detail.progress.percentage
})
```
\== Svelte 4|Svelte 5
```js
import { router } from '@inertiajs/svelte'
router.on('progress', (event) => {
this.form.progress = event.detail.progress.percentage
})
```
:::
The `progress` event is not cancelable.
## Success
The `success` event fires on successful page visits, unless validation errors are present. However, this does not include history visits.
:::tabs key:frameworks
\== Vue
```js
import { router } from '@inertiajs/vue3'
router.on('success', (event) => {
console.log(`Successfully made a visit to ${event.detail.page.url}`)
})
```
\== React
```jsx
import { router } from '@inertiajs/react'
router.on('success', (event) => {
console.log(`Successfully made a visit to ${event.detail.page.url}`)
})
```
\== Svelte 4|Svelte 5
```js
import { router } from '@inertiajs/svelte'
router.on('success', (event) => {
console.log(`Successfully made a visit to ${event.detail.page.url}`)
})
```
:::
The `success` event is not cancelable.
## Error
The `error` event fires when validation errors are present on "successful" page visits.
:::tabs key:frameworks
\== Vue
```js
import { router } from '@inertiajs/vue3'
router.on('error', (errors) => {
console.log(errors)
})
```
\== React
```jsx
import { router } from '@inertiajs/react'
router.on('error', (errors) => {
console.log(errors)
})
```
\== Svelte 4|Svelte 5
```js
import { router } from '@inertiajs/svelte'
router.on('error', (errors) => {
console.log(errors)
})
```
:::
The `error` event is not cancelable.
## Invalid
The invalid event fires when a non-Inertia response is received from the server, such as an HTML or vanilla JSON response. A valid Inertia response is a response that has the `X-Inertia` header set to `true` with a json payload containing [the page object](/guide/the-protocol.md#the-page-object).
This event is fired for all response types, including `200`, `400`, and `500` response codes.
:::tabs key:frameworks
\== Vue
```js
import { router } from '@inertiajs/vue3'
router.on('invalid', (event) => {
console.log(`An invalid Inertia response was received.`)
console.log(event.detail.response)
})
```
\== React
```jsx
import { router } from '@inertiajs/react'
router.on('invalid', (event) => {
console.log(`An invalid Inertia response was received.`)
console.log(event.detail.response)
})
```
\== Svelte 4|Svelte 5
```js
import { router } from '@inertiajs/svelte'
router.on('invalid', (event) => {
console.log(`An invalid Inertia response was received.`)
console.log(event.detail.response)
})
```
:::
You may cancel the `invalid` event to prevent Inertia from showing the non-Inertia response modal.
:::tabs key:frameworks
\== Vue
```js
import { router } from '@inertiajs/vue3'
router.on('invalid', (event) => {
event.preventDefault()
// Handle the invalid response yourself...
})
```
\== React
```jsx
import { router } from '@inertiajs/react'
router.on('invalid', (event) => {
event.preventDefault()
// Handle the invalid response yourself...
})
```
\== Svelte 4|Svelte 5
```js
import { router } from '@inertiajs/svelte'
router.on('invalid', (event) => {
event.preventDefault()
// Handle the invalid response yourself...
})
```
:::
## Exception
The `exception` event fires on unexpected XHR errors such as network interruptions. In addition, this event fires for errors generated when resolving page components.
:::tabs key:frameworks
\== Vue
```js
import { router } from '@inertiajs/vue3'
router.on('exception', (event) => {
console.log(`An unexpected error occurred during an Inertia visit.`)
console.log(event.detail.error)
})
```
\== React
```jsx
import { router } from '@inertiajs/react'
router.on('exception', (event) => {
console.log(`An unexpected error occurred during an Inertia visit.`)
console.log(event.detail.error)
})
```
\== Svelte 4|Svelte 5
```js
import { router } from '@inertiajs/svelte'
router.on('exception', (event) => {
console.log(`An unexpected error occurred during an Inertia visit.`)
console.log(event.detail.error)
})
```
:::
You may cancel the `exception` event to prevent the error from being thrown.
:::tabs key:frameworks
\== Vue
```js
import { router } from '@inertiajs/vue3'
router.on('exception', (event) => {
event.preventDefault()
// Handle the error yourself
})
```
\== React
```jsx
import { router } from '@inertiajs/react'
router.on('exception', (event) => {
event.preventDefault()
// Handle the error yourself
})
```
\== Svelte 4|Svelte 5
```js
import { router } from '@inertiajs/svelte'
router.on('exception', (event) => {
event.preventDefault()
// Handle the error yourself
})
```
:::
This event will *not* fire for XHR requests that receive `400` and `500` level responses or for non-Inertia responses, as these situations are handled in other ways by Inertia. Please consult the [error handling](/guide/error-handling.md) documentation for more information.
## Finish
The `finish` event fires after an XHR request has completed for both "successful" and "unsuccessful" responses. This event is useful for hiding loading indicators.
:::tabs key:frameworks
\== Vue
```js
import { router } from '@inertiajs/vue3'
router.on('finish', (event) => {
NProgress.done()
})
```
\== React
```jsx
import { router } from '@inertiajs/react'
router.on('finish', (event) => {
NProgress.done()
})
```
\== Svelte 4|Svelte 5
```js
import { router } from '@inertiajs/svelte'
router.on('finish', (event) => {
NProgress.done()
})
```
:::
The `finish` event is not cancelable.
## Navigate
The `navigate` event fires on successful page visits, as well as when navigating through history.
:::tabs key:frameworks
\== Vue
```js
import { router } from '@inertiajs/vue3'
router.on('navigate', (event) => {
console.log(`Navigated to ${event.detail.page.url}`)
})
```
\== React
```jsx
import { router } from '@inertiajs/react'
router.on('navigate', (event) => {
console.log(`Navigated to ${event.detail.page.url}`)
})
```
\== Svelte 4|Svelte 5
```js
import { router } from '@inertiajs/svelte'
router.on('navigate', (event) => {
console.log(`Navigated to ${event.detail.page.url}`)
})
```
:::
The `navigate` event is not cancelable.
## Event callbacks
In addition to the global events described throughout this page, Inertia also provides a number of [event callbacks](/guide/manual-visits.md#event-callbacks) that fire when manually making Inertia visits.
---
---
url: /guide/file-uploads.md
---
# File uploads
## FormData conversion
When making Inertia requests that include files (even nested files), Inertia will automatically convert the request data into a `FormData` object. This conversion is necessary in order to submit a `multipart/form-data` request via XHR.
If you would like the request to always use a `FormData` object regardless of whether a file is present in the data, you may provide the `forceFormData` option when making the request.
:::tabs key:frameworks
\== Vue
```js
import { router } from '@inertiajs/vue3'
router.post('/users', data, {
forceFormData: true,
})
```
\== React
```jsx
import { router } from '@inertiajs/react'
router.post('/users', data, {
forceFormData: true,
})
```
\== Svelte 4|Svelte 5
```js
import { router } from '@inertiajs/svelte'
router.post('/users', data, {
forceFormData: true,
})
```
:::
You can learn more about the `FormData` interface via its [MDN documentation](https://developer.mozilla.org/en-US/docs/Web/API/FormData).
> \[!WARNING]
> Prior to version 0.8.0, Inertia did not automatically convert requests to `FormData`. If you're using an Inertia release prior to this version, you will need to manually perform this conversion.
## File upload example
Let's examine a complete file upload example using Inertia. This example includes both a `name` text input and an `avatar` file input.
:::tabs key:frameworks
\== Vue
```vue
```
\== React
```jsx
import { useForm } from '@inertiajs/react'
const { data, setData, post, progress } = useForm({
name: null,
avatar: null,
})
function submit(e) {
e.preventDefault()
post('/users')
}
return (
)
```
\== Svelte 4
```svelte
```
\== Svelte 5
```svelte
```
:::
This example uses the [Inertia form helper](/guide/forms.md) for convenience, since the form helper provides easy access to the current upload progress. However, you are free to submit your forms using [manual Inertia visits](/guide/manual-visits.md) as well.
## Multipart limitations
Uploading files using a `multipart/form-data` request is not natively supported in some server-side frameworks when using the `PUT`, `PATCH`, or `DELETE` HTTP methods. The simplest workaround for this limitation is to simply upload files using a `POST` request instead.
However, some frameworks, such as Laravel and Rails, support form method spoofing, which allows you to upload the files using `POST`, but have the framework handle the request as a `PUT` or `PATCH` request. This is done by including a `_method` attribute or a `X-HTTP-METHOD-OVERRIDE` header in the request.
> \[!NOTE]
> For more info see [`Rack::MethodOverride`](https://github.com/rack/rack/blob/main/lib/rack/method_override.rb).
:::tabs key:frameworks
\== Vue
```js
import { router } from '@inertiajs/vue3'
router.post(`/users/${user.id}`, {
_method: 'put',
avatar: form.avatar,
})
// or
form.post(`/users/${user.id}`, {
headers: { 'X-HTTP-METHOD-OVERRIDE': 'put' },
})
```
\== React
```js
import { router } from '@inertiajs/react'
router.post(`/users/${user.id}`, {
_method: 'put',
avatar: form.avatar,
})
// or
form.post(`/users/${user.id}`, {
headers: { 'X-HTTP-METHOD-OVERRIDE': 'put' },
})
```
\== Svelte 4|Svelte 5
```js
import { router } from '@inertiajs/svelte'
router.post(`/users/${user.id}`, {
_method: 'put',
avatar: form.avatar,
})
// or
form.post(`/users/${user.id}`, {
headers: { 'X-HTTP-METHOD-OVERRIDE': 'put' },
})
```
:::
---
---
url: /guide/forms.md
---
# Forms
## Submitting forms
While it's possible to make classic HTML form submissions with Inertia, it's not recommended since they cause full-page reloads. Instead, it's better to intercept form submissions and then make the [request using Inertia](/guide/manual-visits.md).
:::tabs key:frameworks
\== Vue
```vue
```
\== React
```jsx
import { useState } from 'react'
import { router } from '@inertiajs/react'
export default function Edit() {
const [values, setValues] = useState({
first_name: '',
last_name: '',
email: '',
})
function handleChange(e) {
const key = e.target.id
const value = e.target.value
setValues((values) => ({
...values,
[key]: value,
}))
}
function handleSubmit(e) {
e.preventDefault()
router.post('/users', values)
}
return (
)
}
```
\== Svelte 4
```svelte
```
\== Svelte 5
```svelte
```
:::
As you may have noticed in the example above, when using Inertia, you don't typically need to inspect form responses client-side like you would when making XHR / fetch requests manually.
Instead, your server-side route / controller typically issues a [redirect](/guide/redirects.md) response. And, Of course, there is nothing stopping you from redirecting the user right back to the page they were previously on. Using this approach, handling Inertia form submissions feels very similar to handling classic HTML form submissions.
```ruby
class UsersController < ApplicationController
def create
user = User.new(user_params)
if user.save
redirect_to users_url
else
redirect_to new_user_url, inertia: { errors: user.errors }
end
end
private
def user_params
params.require(:user).permit(:name, :email)
end
end
```
## Server-side validation
Handling server-side validation errors in Inertia works a little different than handling errors from manual XHR / fetch requests. When making XHR / fetch requests, you typically inspect the response for a `422` status code and manually update the form's error state.
However, when using Inertia, a `422` response is never returned by your server. Instead, as we saw in the example above, your routes / controllers will typically return a redirect response - much like a classic, full-page form submission.
For a full discussion on handling and displaying [validation](/guide/validation.md) errors with Inertia, please consult the validation documentation.
## Form helper
Since working with forms is so common, Inertia includes a form helper designed to help reduce the amount of boilerplate code needed for handling typical form submissions.
:::tabs key:frameworks
\== Vue
```vue
```
\== React
```jsx
import { useForm } from '@inertiajs/react'
const { data, setData, post, processing, errors } = useForm({
email: '',
password: '',
remember: false,
})
function submit(e) {
e.preventDefault()
post('/login')
}
return (
)
```
\== Svelte 4
```svelte
```
\== Svelte 5
```svelte
```
:::
To submit the form, you may use the `get`, `post`, `put`, `patch` and `delete` methods.
:::tabs key:frameworks
\== Vue
```js
form.submit(method, url, options)
form.get(url, options)
form.post(url, options)
form.put(url, options)
form.patch(url, options)
form.delete(url, options)
```
\== React
```jsx
const { submit, get, post, put, patch, delete: destroy } = useForm({ ... })
submit(method, url, options)
get(url, options)
post(url, options)
put(url, options)
patch(url, options)
destroy(url, options)
```
\== Svelte 4|Svelte 5
```js
$form.submit(method, url, options)
$form.get(url, options)
$form.post(url, options)
$form.put(url, options)
$form.patch(url, options)
$form.delete(url, options)
```
:::
The submit methods support all of the typical [visit options](/guide/manual-visits.md), such as `preserveState`, `preserveScroll`, and event callbacks, which can be helpful for performing tasks on successful form submissions. For example, you might use the `onSuccess` callback to reset inputs to their original state.
:::tabs key:frameworks
\== Vue
```js
form.post('/profile', {
preserveScroll: true,
onSuccess: () => form.reset('password'),
})
```
\== React
```jsx
const { post, reset } = useForm({ ... })
post('/profile', {
preserveScroll: true,
onSuccess: () => reset('password'),
})
```
\== Svelte 4|Svelte 5
```js
$form.post('/profile', {
preserveScroll: true,
onSuccess: () => $form.reset('password'),
})
```
:::
If you need to modify the form data before it's sent to the server, you can do so via the `transform()` method.
:::tabs key:frameworks
\== Vue
```js
form
.transform((data) => ({
...data,
remember: data.remember ? 'on' : '',
}))
.post('/login')
```
\== React
```jsx
const { transform } = useForm({ ... })
transform((data) => ({
...data,
remember: data.remember ? 'on' : '',
}))
```
\== Svelte 4|Svelte 5
```js
$form
.transform((data) => ({
...data,
remember: data.remember ? 'on' : '',
}))
.post('/login')
```
:::
You can use the `processing` property to track if a form is currently being submitted. This can be helpful for preventing double form submissions by disabling the submit button.
:::tabs key:frameworks
\== Vue
```vue
```
\== React
```jsx
const { processing } = useForm({ ... })
```
\== Svelte 4|Svelte 5
```svelte
```
:::
If your form is uploading files, the current progress event is available via the `progress` property, allowing you to easily display the upload progress.
:::tabs key:frameworks
\== Vue
```vue
```
\== React
```jsx
const { progress } = useForm({ ... })
{progress && (
)}
```
\== Svelte 4|Svelte 5
```svelte
{#if $form.progress}
{/if}
```
:::
If there are form validation errors, they are available via the `errors` property. When building Rails powered Inertia applications, form errors will automatically be populated when your application throws instances of `ActiveRecord::RecordInvalid`, such as when using `#save!`.
:::tabs key:frameworks
\== Vue
```vue
{/if}
```
:::
> \[!NOTE]
> For a more thorough discussion of form validation and errors, please consult the [validation documentation](/guide/validation.md).
To determine if a form has any errors, you may use the `hasErrors` property. To clear form errors, use the `clearErrors()` method.
:::tabs key:frameworks
\== Vue
```js
// Clear all errors...
form.clearErrors()
// Clear errors for specific fields...
form.clearErrors('field', 'anotherfield')
```
\== React
```jsx
const { clearErrors } = useForm({ ... })
// Clear all errors...
clearErrors()
// Clear errors for specific fields...
clearErrors('field', 'anotherfield')
```
\== Svelte 4|Svelte 5
```js
// Clear all errors...
$form.clearErrors()
// Clear errors for specific fields...
$form.clearErrors('field', 'anotherfield')
```
:::
If you're using a client-side input validation libraries or do client-side validation manually, you can set your own errors on the form using the `setError()` method.
:::tabs key:frameworks
\== Vue
```js
// Set a single error...
form.setError('field', 'Your error message.')
// Set multiple errors at once...
form.setError({
foo: 'Your error message for the foo field.',
bar: 'Some other error for the bar field.',
})
```
\== React
```jsx
const { setError } = useForm({ ... })
// Set a single error...
setError('field', 'Your error message.');
// Set multiple errors at once...
setError({
foo: 'Your error message for the foo field.',
bar: 'Some other error for the bar field.'
});
```
\== Svelte 4|Svelte 5
```js
// Set a single error
$form.setError('field', 'Your error message.')
// Set multiple errors at once
$form.setError({
foo: 'Your error message for the foo field.',
bar: 'Some other error for the bar field.',
})
```
:::
> \[!NOTE]
> Unlike an actual form submission, the page's props remain unchanged when manually setting errors on a form instance.
When a form has been successfully submitted, the `wasSuccessful` property will be `true`. In addition to this, forms have a `recentlySuccessful` property, which will be set to `true` for two seconds after a successful form submission. This property can be utilized to show temporary success messages.
To reset the form's values back to their default values, you can use the `reset()` method.
:::tabs key:frameworks
\== Vue
```js
// Reset the form...
form.reset()
// Reset specific fields...
form.reset('field', 'anotherfield')
```
\== React
```jsx
const { reset } = useForm({ ... })
// Reset the form...
reset()
// Reset specific fields...
reset('field', 'anotherfield')
```
\== Svelte 4|Svelte 5
```js
// Reset the form...
$form.reset()
// Reset specific fields...
$form.reset('field', 'anotherfield')
```
:::
If your form's default values become outdated, you can use the `defaults()` method to update them. Then, the form will be reset to the correct values the next time the `reset()` method is invoked.
:::tabs key:frameworks
\== Vue
```js
// Set the form's current values as the new defaults...
form.defaults()
// Update the default value of a single field...
form.defaults('email', 'updated-default@example.com')
// Update the default value of multiple fields...
form.defaults({
name: 'Updated Example',
email: 'updated-default@example.com',
})
```
\== React
```jsx
const { setDefaults } = useForm({ ... })
// Set the form's current values as the new defaults...
setDefaults()
// Update the default value of a single field...
setDefaults('email', 'updated-default@example.com')
// Update the default value of multiple fields...
setDefaults({
name: 'Updated Example',
email: 'updated-default@example.com',
})
```
\== Svelte 4|Svelte 5
```js
// Set the form's current values as the new defaults...
$form.defaults()
// Update the default value of a single field...
$form.defaults('email', 'updated-default@example.com')
// Change the default value of multiple fields...
$form.defaults({
name: 'Updated Example',
email: 'updated-default@example.com',
})
```
:::
To determine if a form has any changes, you may use the `isDirty` property.
:::tabs key:frameworks
\== Vue
```vue
{/if}
```
:::
To cancel a form submission, use the `cancel()` method.
:::tabs key:frameworks
\== Vue
```vue
form.cancel()
```
\== React
```jsx
const { cancel } = useForm({ ... })
cancel()
```
\== Svelte 4|Svelte 5
```svelte
$form.cancel()
```
:::
To instruct Inertia to store a form's data and errors in [history state](/guide/remembering-state.md), you can provide a unique form key as the first argument when instantiating your form.
:::tabs key:frameworks
\== Vue
```js
import { useForm } from '@inertiajs/vue3'
const form = useForm('CreateUser', data)
const form = useForm(`EditUser:${user.id}`, data)
```
\== React
```js
import { useForm } from '@inertiajs/react'
const form = useForm('CreateUser', data)
const form = useForm(`EditUser:${user.id}`, data)
```
\== Svelte 4|Svelte 5
```js
import { useForm } from '@inertiajs/svelte'
const form = useForm('CreateUser', data)
const form = useForm(`EditUser:${user.id}`, data)
```
:::
## File uploads
When making requests or form submissions that include files, Inertia will automatically convert the request data into a `FormData` object.
For a more thorough discussion of file uploads, please consult the [file uploads documentation](/guide/file-uploads.md).
## XHR / fetch submissions
Using Inertia to submit forms works great for the vast majority of situations; however, in the event that you need more control over the form submission, you're free to make plain XHR or `fetch` requests instead using the library of your choice.
---
---
url: /cookbook/handling-validation-error-types.md
---
# Handling Rails validation error types
When using Inertia Rails with TypeScript, you might encounter a mismatch between the way Rails and Inertia handle validation errors.
* Inertia's `useForm` hook expects the `errors` object to have values as single strings (e.g., `"This field is required"`).
* Rails model errors (`model.errors`), however, provide an array of strings for each field (e.g., `["This field is required", "Must be unique"]`).
If you pass `inertia: { errors: user.errors }` directly from a Rails controller, this mismatch will cause a type conflict.
We'll explore two options to resolve this issue.
## Option 1: Adjust Inertia types
You can update the TypeScript definitions to match the Rails error format (arrays of strings).
Create a custom type definition file in your project:
:::tabs key:frameworks
\== Vue
```typescript
// frontend/app/types/inertia-rails.d.ts
import type { FormDataConvertible, FormDataKeys } from '@inertiajs/core'
import type { InertiaFormProps as OriginalProps } from '@inertiajs/vue3'
type FormDataType = Record
declare module '@inertiajs/vue3' {
interface InertiaFormProps
extends Omit, 'errors' | 'setError'> {
errors: Partial, string[]>>
setError(field: FormDataKeys, value: string[]): this
setError(errors: Record, string[]>): this
}
export type InertiaForm = TForm &
InertiaFormProps
export { InertiaFormProps, InertiaForm }
export function useForm(
data: TForm | (() => TForm),
): InertiaForm
export function useForm(
rememberKey: string,
data: TForm | (() => TForm),
): InertiaForm
}
```
\== React
```typescript
// frontend/app/types/inertia-rails.d.ts
import type { FormDataConvertible, FormDataKeys } from '@inertiajs/core'
import type { InertiaFormProps as OriginalProps } from '@inertiajs/react'
type FormDataType = Record
declare module '@inertiajs/react' {
interface InertiaFormProps
extends Omit, 'errors' | 'setError'> {
errors: Partial, string[]>>
setError(field: FormDataKeys, value: string[]): void
setError(errors: Record, string[]>): void
}
export { InertiaFormProps }
export function useForm(
initialValues?: TForm,
): InertiaFormProps
export function useForm(
rememberKey: string,
initialValues?: TForm,
): InertiaFormProps
}
```
\== Svelte 4|Svelte 5
```typescript
// frontend/app/types/inertia-rails.d.ts
import type { FormDataConvertible, FormDataKeys } from '@inertiajs/core'
import type { InertiaFormProps as OriginalProps } from '@inertiajs/svelte'
import type { Writable } from 'svelte/store'
type FormDataType = Record
declare module '@inertiajs/svelte' {
interface InertiaFormProps
extends Omit, 'errors' | 'setError'> {
errors: Partial, string[]>>
setError(field: FormDataKeys, value: string[]): this
setError(errors: Record, string[]>): this
}
type InertiaForm = InertiaFormProps & TForm
export { InertiaFormProps, InertiaForm }
export function useForm(
data: TForm | (() => TForm),
): Writable>
export function useForm(
rememberKey: string,
data: TForm | (() => TForm),
): Writable>
}
```
:::
This tells TypeScript to expect errors as arrays of strings, matching Rails' format.
> \[!NOTE]
> Make sure that `d.ts` files are referenced in your `tsconfig.json` or `tsconfig.app.json`. If it reads something like `"include": ["app/frontend/**/*.ts"]` or `"include": ["app/frontend/**/*"]` and your `d.ts` file is inside `app/frontend`, it should work.
## Option 2: Serialize errors in Rails
You can add a helper on the Rails backend to convert error arrays into single strings before sending them to Inertia.
1. Add a helper method (e.g., in `ApplicationController`):
```ruby
def inertia_errors(model)
{
errors: model.errors.to_hash(true).transform_values(&:to_sentence)
}
end
```
This combines multiple error messages for each field into a single string.
2. Use the helper when redirecting with errors:
```ruby
redirect_back inertia: inertia_errors(model)
```
This ensures the errors sent to the frontend are single strings, matching Inertia's default expectations.
---
---
url: /guide/history-encryption.md
---
# History encryption
Imagine a scenario where your user is authenticated, browses privileged information on your site, then logs out. If they press the back button, they can still see the privileged information that is stored in the window's history state. This is a security risk. To prevent this, Inertia.js provides a history encryption feature.
## How it works
When you instruct Inertia to encrypt your app's history, it uses the browser's built-in [`crypto` api](https://developer.mozilla.org/en-US/docs/Web/API/Crypto) to encrypt the current page's data before pushing it to the history state. We store the corresponding key in the browser's session storage. When the user navigates back to a page, we decrypt the data using the key stored in the session storage.
Once you instruct Inertia to clear your history state, we simply clear the existing key from session storage roll a new one. If we attempt to decrypt the history state with the new key, it will fail an Inertia will make a fresh request back to your server for the page data.
> \[!NOTE]
> History encryption relies on `window.crypto.subtle` which is only available in secure environments (sites with SSL enabled).
## Opting in
History encryption is an opt-in feature. There are several methods for enabling it:
### Global encryption
If you'd like to enable history encryption globally, set the `encrypt_history` config value to `true`.
You are able to opt out of encryption on specific pages by passing `false` to the `encrypt_history` option:
```ruby
render inertia: 'Homepage', props: {}, encrypt_history: false
```
### Per-request encryption
To encrypt the history of an individual request, simply pass `true` to the `encrypt_history` option:
```ruby
render inertia: 'Dashboard', props: {}, encrypt_history: true
```
### Controller-level encryption
You can also enable history encryption for all actions in a controller by setting the `encrypt_history` config value in the controller:
```ruby
class DashboardController < ApplicationController
inertia_config(encrypt_history: true)
# ...
end
```
## Clearing history
To clear the history state, you can pass the `clear_history` option to the `render` method:
```ruby
render inertia: 'Dashboard', props: {}, clear_history: true
```
Once the response has rendered on the client, the encryption key will be rotated, rendering the previous history state unreadable.
You can also clear history on the client site by calling `router.clearHistory()`.
---
---
url: /guide/how-it-works.md
---
# How it works
With Inertia you build applications just like you've always done with your server-side web framework of choice. You use your framework's existing functionality for routing, controllers, middleware, authentication, authorization, data fetching, and more.
However, Inertia replaces your application's view layer. Instead of using server-side rendering via PHP or Ruby templates, the views returned by your application are JavaScript page components. This allows you to build your entire frontend using React, Vue, or Svelte, while still enjoying the productivity of Laravel or your preferred server-side framework.
As you might expect, simply creating your frontend in JavaScript doesn't give you a single-page application experience. If you were to click a link, your browser would make a full page visit, which would then cause your client-side framework to reboot on the subsequent page load. This is where Inertia changes everything.
At its core, Inertia is essentially a client-side routing library. It allows you to make page visits without forcing a full page reload. This is done using the `` component, a light-weight wrapper around a normal anchor link. When you click an Inertia link, Inertia intercepts the click and makes the visit via XHR instead. You can even make these visits programmatically in JavaScript using `router.visit()`.
When Inertia makes an XHR visit, the server detects that it's an Inertia visit and, instead of returning a full HTML response, it returns a JSON response with the JavaScript page component name and data (props). Inertia then dynamically swaps out the previous page component with the new page component and updates the browser's history state.
**The end result is a silky smooth single-page experience. 🎉**
To learn more about the nitty-gritty, technical details of how Inertia works under the hood, check out [the protocol page](/guide/the-protocol.md).
---
---
url: /cookbook/inertia-modal.md
---
# Inertia Modal
[Inertia Modal](https://github.com/inertiaui/modal) is a powerful library that enables you to render any Inertia page
as a modal dialog. It seamlessly integrates with your existing Inertia Rails application, allowing you to create modal
workflows without the complexity of managing modal state manually.
Here's a summary of the features:
* Supports React and Vue
* Zero backend configuration
* Super simple frontend API
* Support for Base Route / URL
* Modal and slideover support
* Headless support
* Nested/stacked modals support
* Reusable modals
* Multiple sizes and positions
* Reload props in modals
* Easy communication between nested/stacked modals
* Highly configurable
While you can use Inertia Modal without changes on the backend, we recommend using the Rails gem
[`inertia_rails-contrib`](https://github.com/skryukov/inertia_rails-contrib) to enhance your modals with base URL support. This ensures that your modals are accessible,
SEO-friendly, and provide a better user experience.
> \[!NOTE]
> Svelte 5 is not yet supported by Inertia Modal.
## Installation
### 1. Install the NPM Package
:::tabs key:frameworks
\== Vue
```bash
npm install @inertiaui/modal-vue
```
\== React
```bash
npm install @inertiaui/modal-react
```
:::
### 2. Configure Inertia
Update your Inertia app setup to include the modal plugin:
:::tabs key:frameworks
\== Vue
```js
// frontend/entrypoints/inertia.js
import { createApp, h } from 'vue'
import { createInertiaApp } from '@inertiajs/vue3'
import { renderApp } from '@inertiaui/modal-vue' // [!code ++]
createInertiaApp({
resolve: (name) => {
const pages = import.meta.glob('../pages/**/*.vue', { eager: true })
return pages[`../pages/${name}.vue`]
},
setup({ el, App, props, plugin }) {
createApp({ render: () => h(App, props) }) // [!code --]
createApp({ render: renderApp(App, props) }) // [!code ++]
.use(plugin)
.mount(el)
},
})
```
\== React
```js
// frontend/entrypoints/inertia.js
import { createInertiaApp } from '@inertiajs/react'
import { createElement } from 'react' // [!code --]
import { renderApp } from '@inertiaui/modal-react' // [!code ++]
import { createRoot } from 'react-dom/client'
createInertiaApp({
resolve: (name) => {
const pages = import.meta.glob('../pages/**/*.jsx', { eager: true })
return pages[`../pages/${name}.jsx`]
},
setup({ el, App, props }) {
const root = createRoot(el)
root.render(createElement(App, props)) // [!code --]
root.render(renderApp(App, props)) // [!code ++]
},
})
```
:::
### 3. Tailwind CSS Configuration
:::tabs key:frameworks
\== Vue
For Tailwind CSS v4, add the modal styles to your CSS:
```css
/* app/entrypoints/frontend/application.css */
@source "../../../node_modules/@inertiaui/modal-vue";
```
For Tailwind CSS v3, update your `tailwind.config.js`:
```js
export default {
content: [
'./node_modules/@inertiaui/modal-vue/src/**/*.{js,vue}',
// other paths...
],
}
```
\== React
For Tailwind CSS v4, add the modal styles to your CSS:
```css
/* app/entrypoints/frontend/application.css */
@source "../../../node_modules/@inertiaui/modal-react";
```
For Tailwind CSS v3, update your `tailwind.config.js`:
```js
export default {
content: [
'./node_modules/@inertiaui/modal-react/src/**/*.{js,jsx}',
// other paths...
],
}
```
:::
### 4. Add the Ruby Gem (optional but recommended)
Install the [`inertia_rails-contrib`](https://github.com/skryukov/inertia_rails-contrib) gem to your Rails application to enable base URL support for modals:
```bash
bundle add inertia_rails-contrib
```
## Basic example
The package comes with two components: `Modal` and `ModalLink`. `ModalLink` is very similar to Inertia's [built-in
`Link` component](/guide/links), but it opens the linked route in a modal instead of a full page load. So, if you have a
link that you want to open in a modal, you can simply replace `Link` with `ModalLink`.
:::tabs key:frameworks
\== Vue
```vue
Create User
Create User
```
\== React
```jsx
import {Link} from '@inertiajs/react' // [!code --]
import {ModalLink} from '@inertiaui/modal-react' // [!code ++]
export const CreateUserButton = () => {
return (
Create User // [!code --]
Create User // [!code ++]
)
}
```
:::
The page you linked can then use the `Modal` component to wrap its content in a modal.
:::tabs key:frameworks
\== Vue
```vue
{/* [!code --] */}
{/* [!code ++] */}
)
}
```
:::
That's it! There is no need to change anything about your routes or controllers!
## Enhanced Usage With Base URL Support
By default, Inertia Modal doesn't change the URL when opening a modal. It just stays on the same page and displays the
modal content. However, you may want to change this behavior and update the URL when opening a modal. This has a few
benefits:
* It allows users to bookmark the modal and share the URL with others.
* The modal becomes part of the browser history, so users can use the back and forward buttons.
* It makes the modal content accessible to search engines (when using [SSR](/guide/server-side-rendering)).
* It allows you to open the modal in a new tab.
> \[!NOTE]
> To enable this feature, you need to use the [`inertia_rails-contrib`](https://github.com/skryukov/inertia_rails-contrib) gem, which provides base URL support for modals.
## Define a Base Route
To define the base route for your modal, you need to use the `inertia_modal` renderer in your controller instead of the
`inertia` one. It accepts the same arguments as the `inertia` renderer:
```ruby
class UsersController < ApplicationController
def edit
render inertia: 'Users/Edit', props: { # [!code --]
render inertia_modal: 'Users/Edit', props: { # [!code ++]
user:,
roles: -> { Role.all },
}
end
end
```
Then, you can pass the `base_url` parameter to the `inertia_modal` renderer to define the base route for your modal:
```ruby
class UsersController < ApplicationController
def edit
render inertia_modal: 'Users/Edit', props: {
user:,
roles: -> { Role.all },
} # [!code --]
}, base_url : users_path # [!code ++]
end
end
```
> \[!WARNING] Reusing the Modal URL with different Base Routes
> The `base_url` parameter acts merely as a fallback when the modal is directly opened using a URL. If you open the
> modal from a different route, the URL will be generated based on the current route.
## Open a Modal with a Base Route
Finally, the frontend needs to know that we're using the browser history to navigate between modals. To do this, you need
to add the `navigate` attribute to the `ModalLink` component:
:::tabs key:frameworks
\== Vue
```vue
Create User
```
\== React
```jsx
export default function UserIndex() {
return (
Create User
)
}
```
:::
Now, when you click the "Create User" link, it will open the modal and update the URL to `/users/create`.
## Further Reading
For advanced usage, configuration options, and additional features, check out [the official Inertia Modal documentation](https://inertiaui.com/inertia-modal/docs).
---
---
url: /cookbook/integrating-shadcn-ui.md
---
# Integrating `shadcn/ui`
This guide demonstrates how to integrate [shadcn/ui](https://ui.shadcn.com) - a collection of reusable React components - with your Inertia Rails application.
## Getting Started in 5 Minutes
If you're starting fresh, create a new Rails application with Inertia (or skip this step if you already have one):
:::tabs key:languages
\== TypeScript
```bash
rails new -JA shadcn-inertia-rails
cd shadcn-inertia-rails
bundle add inertia_rails
rails generate inertia:install --framework=react --typescript --vite --tailwind --no-interactive
Installing Inertia's Rails adapter
...
```
\== JavaScript
```bash
rails new -JA shadcn-inertia-rails
cd shadcn-inertia-rails
bundle add inertia_rails
rails generate inertia:install --framework=react --vite --tailwind --no-interactive
Installing Inertia's Rails adapter
...
```
:::
> \[!NOTE]
> You can also run `rails generate inertia:install` to run the installer interactively.
> Need more details on the initial setup? Check out our [server-side setup guide](/guide/server-side-setup.md).
## Setting Up Path Aliases
Let's configure our project to work seamlessly with `shadcn/ui`. Choose your path based on whether you're using TypeScript or JavaScript.
:::tabs key:languages
\== TypeScript
You'll need to configure two files. First, update your `tsconfig.app.json`:
```json lines
{
"compilerOptions": {
// ...
"baseUrl": ".",
"paths": {
"@/*": ["./app/frontend/*"]
}
}
// ...
}
```
Then, set up your `tsconfig.json` to match `shadcn/ui`'s requirements (note the `baseUrl` and `paths` properties are different from the `tsconfig.app.json`):
```json lines
{
//...
"compilerOptions": {
/* Required for shadcn-ui/ui */
"baseUrl": "./app/frontend",
"paths": {
"@/*": ["./*"]
}
}
}
```
\== JavaScript
Using JavaScript? It's even simpler! Just create a `jsconfig.json`:
```json
{
"compilerOptions": {
"baseUrl": "./app/frontend",
"paths": {
"@/*": ["./*"]
}
}
}
```
:::
## Initializing `shadcn/ui`
Now you can initialize `shadcn/ui` with a single command:
```bash
npx shadcn@latest init
✔ Preflight checks.
✔ Verifying framework. Found Vite.
✔ Validating Tailwind CSS.
✔ Validating import alias.
✔ Which style would you like to use? › New York
✔ Which color would you like to use as the base color? › Neutral
✔ Would you like to use CSS variables for theming? … no / yes
✔ Writing components.json.
✔ Checking registry.
✔ Updating tailwind.config.js
✔ Updating app/frontend/entrypoints/application.css
✔ Installing dependencies.
✔ Created 1 file:
- app/frontend/lib/utils.js
Success! Project initialization completed.
You may now add components.
```
You're all set! Want to try it out? Add your first component:
```shell
npx shadcn@latest add button
```
Now you can import and use your new button component from `@/components/ui/button`. Happy coding!
> \[!NOTE]
> Check out the [`shadcn/ui` components gallery](https://ui.shadcn.com/docs/components/accordion) to explore all the beautiful components at your disposal.
---
---
url: /guide.md
---
# Introduction
Welcome to the documentation for [inertia\_rails](https://github.com/inertiajs/inertia-rails) adapter for [Ruby on Rails](https://rubyonrails.org/) and [Inertia.js](https://inertiajs.com/).
## Why adapter-specific documentation?
The [official documentation for Inertia.js](https://inertiajs.com) is great, but it's not Rails-specific anymore (see the [legacy docs](https://legacy.inertiajs.com)). This documentation aims to fill in the gaps and provide Rails-specific examples and explanations.
## JavaScript apps the monolith way
Inertia is a new approach to building classic server-driven web apps. We call it the modern monolith.
Inertia allows you to create fully client-side rendered, single-page apps, without the complexity that comes with modern SPAs. It does this by leveraging existing server-side patterns that you already love.
Inertia has no client-side routing, nor does it require an API. Simply build controllers and page views like you've always done!
### Not a framework
Inertia isn't a framework, nor is it a replacement for your existing server-side or client-side frameworks. Rather, it's designed to work with them. Think of Inertia as glue that connects the two. Inertia does this via adapters. We currently have three official client-side adapters (React, Vue, and Svelte) and two server-side adapters (Laravel and Rails).
### Next steps
Want to learn a bit more before diving in? Check out the [who is it for](/guide/who-is-it-for.md) and [how it works](/guide/how-it-works.md) pages. Or, if you're ready to get started, jump right into the [installation instructions](/guide/server-side-setup.md).
---
---
url: /guide/links.md
---
# Links
To create links to other pages within an Inertia app, you will typically use the Inertia `` component. This component is a light wrapper around a standard anchor `` link that intercepts click events and prevents full page reloads. This is [how Inertia provides a single-page app experience](/guide/how-it-works.md) once your application has been loaded.
## Creating links
To create an Inertia link, use the Inertia `` component. Any attributes you provide to this component will be proxied to the underlying HTML tag.
:::tabs key:frameworks
\== Vue
```vue
Home
```
\== React
```jsx
import { Link } from '@inertiajs/react'
export default () => Home
```
\== Svelte 4|Svelte 5
```svelte
Home
Home
```
> \[!TIP]
> The `use:inertia` action can be applied to any HTML element.
:::
By default, Inertia renders links as anchor `` elements. However, you can change the tag using the `as` prop.
:::tabs key:frameworks
\== Vue
```vue
Logout
```
\== React
```jsx
import { Link } from '@inertiajs/react'
export default () => (
Logout
)
// Renders as...
//
```
\== Svelte 4|Svelte 5
```svelte
Logout
```
:::
> \[!NOTE]
> Creating `POST/PUT/PATCH/DELETE` anchor `` links is discouraged as it causes "Open Link in New Tab / Window" accessibility issues. The component automatically renders a `
```
:::
## Data
When making `POST` or `PUT` requests, you may wish to add additional data to the request. You can accomplish this using the `data` prop. The provided data can be an `object` or `FormData` instance.
:::tabs key:frameworks
\== Vue
```vue
Save
```
\== React
```jsx
import { Link } from '@inertiajs/react'
export default () => (
Save
)
```
\== Svelte 4|Svelte 5
```svelte
Save
```
:::
## Custom headers
The `headers` prop allows you to add custom headers to an Inertia link. However, the headers Inertia uses internally to communicate its state to the server take priority and therefore cannot be overwritten.
:::tabs key:frameworks
\== Vue
```vue
Save
```
\== React
```jsx
import { Link } from '@inertiajs/react'
export default () => (
Save
)
```
\== Svelte 4|Svelte 5
```svelte
Save
```
:::
## Browser history
The `replace` prop allows you to specify the browser's history behavior. By default, page visits push (new) state (`window.history.pushState`) into the history; however, it's also possible to replace state (`window.history.replaceState`) by setting the `replace` prop to `true`. This will cause the visit to replace the current history state instead of adding a new history state to the stack.
:::tabs key:frameworks
\== Vue
```vue
Home
```
\== React
```jsx
import { Link } from '@inertiajs/react'
export default () => (
Home
)
```
\== Svelte 4|Svelte 5
```svelte
Home
Home
```
:::
## State preservation
You can preserve a page component's local state using the `preserveState` prop. This will prevent a page component from fully re-rendering. The `preserveState` prop is especially helpful on pages that contain forms, since you can avoid manually repopulating input fields and can also maintain a focused input.
:::tabs key:frameworks
\== Vue
```vue
Search
```
\== React
```jsx
import { Link } from '@inertiajs/react'
export default () => (
<>
Search
)
```
\== Svelte 4|Svelte 5
```svelte
Search
```
:::
## Scroll preservation
You can use the `preserveScroll` prop to prevent Inertia from automatically resetting the scroll position when making a page visit.
:::tabs key:frameworks
\== Vue
```vue
Home
```
\== React
```jsx
import { Link } from '@inertiajs/react'
export default () => (
Home
)
```
\== Svelte 4|Svelte 5
```svelte
Home
Home
```
:::
For more information on managing scroll position, please consult the documentation on [scroll management](/guide/scroll-management).
## Partial reloads
The `only` prop allows you to specify that only a subset of a page's props (data) should be retrieved from the server on subsequent visits to that page.
:::tabs key:frameworks
\== Vue
```vue
Show active
```
\== React
```jsx
import { Link } from '@inertiajs/react'
export default () => (
Show active
)
```
\== Svelte 4|Svelte 5
```svelte
Show active
Show active
```
:::
For more information on this topic, please consult the complete documentation on [partial reloads](/guide/partial-reloads.md).
## Active states
It's often desirable to set an active state for navigation links based on the current page. This can be accomplished when using Inertia by inspecting the `page` object and doing string comparisons against the `page.url` and `page.component` properties.
:::tabs key:frameworks
\== Vue
```vue
Users
Users
Users
Users
```
\== React
```jsx
import { usePage } from '@inertiajs/react'
export default () => {
const { url, component } = usePage()
return (
<>
// URL exact match...
Users
// Component exact match...
Users
// URL starts with (/users, /users/create, /users/1, etc.)...
Users
// Component starts with (Users/Index, Users/Create, Users/Show, etc.)...
Users
)
}
```
\== Svelte 4|Svelte 5
```svelte
Users
Users
Users
Users
```
:::
You can perform exact match comparisons (`===`), `startsWith()` comparisons (useful for matching a subset of pages), or even more complex comparisons using regular expressions.
Using this approach, you're not limited to just setting class names. You can use this technique to conditionally render any markup on active state, such as different link text or even an SVG icon that represents the link is active.
## Data loading attribute
While a link is making an active request, a `data-loading` attribute is added to the link element. This allows you to style the link while it's in a loading state. The attribute is removed once the request is complete.
---
---
url: /guide/load-when-visible.md
---
# Load when visible
Inertia supports lazy loading data on scroll using the Intersection Observer API. It provides the `WhenVisible` component as a convenient way to load data when an element becomes visible in the viewport.
The `WhenVisible` component accepts a `data` prop that specifies the key of the prop to load. It also accepts a `fallback` prop that specifies a component to render while the data is loading. The `WhenVisible` component should wrap the component that depends on the data.
:::tabs key:frameworks
\== Vue
```vue
{/snippet}
{#each permissions as permission}
{/each}
```
:::
If you'd like to load multiple props when an element becomes visible, you can provide an array to the `data` prop.
:::tabs key:frameworks
\== Vue
```vue
{/snippet}
```
:::
## Loading before visible
If you'd like to start loading data before the element is visible, you can provide a value to the `buffer` prop. The buffer value is a number that represents the number of pixels before the element is visible.
:::tabs key:frameworks
\== Vue
```vue
{/snippet}
{#each permissions as permission}
{/each}
```
:::
In the above example, the data will start loading 500 pixels before the element is visible.
By default, the `WhenVisible` component wraps the fallback template in a `div` element so it can ensure the element is visible in the viewport. If you want to customize the wrapper element, you can provide the `as` prop.
:::tabs key:frameworks
\== Vue
```vue
```
\== React
```jsx
import { WhenVisible } from '@inertiajs/react'
export default () => (
)
```
\== Svelte 4
```svelte
```
\== Svelte 5
```svelte
```
:::
## Always trigger
By default, the `WhenVisible` component will only trigger once when the element becomes visible. If you want to always trigger the data loading when the element is visible, you can provide the `always` prop.
This is useful when you want to load data every time the element becomes visible, such as when the element is at the end of an infinite scroll list and you want to load more data.
Note that if the data loading request is already in flight, the component will wait until it is finished to start the next request if the element is still visible in the viewport.
:::tabs key:frameworks
\== Vue
```vue
```
\== React
```jsx
import { WhenVisible } from '@inertiajs/react'
export default () => (
)
```
\== Svelte 4
```svelte
```
\== Svelte 5
```svelte
```
:::
---
---
url: /guide/manual-visits.md
---
# Manual visits
In addition to [creating links](/guide/links.md), it's also possible to manually make Inertia visits / requests programmatically via JavaScript. This is accomplished via the `router.visit()` method.
:::tabs key:frameworks
\== Vue
```js
import { router } from '@inertiajs/vue3'
router.visit(url, {
method: 'get',
data: {},
replace: false,
preserveState: false,
preserveScroll: false,
only: [],
except: [],
headers: {},
errorBag: null,
forceFormData: false,
queryStringArrayFormat: 'brackets',
async: false,
showProgress: true,
fresh: false,
reset: [],
preserveUrl: false,
prefetch: false,
onCancelToken: (cancelToken) => {},
onCancel: () => {},
onBefore: (visit) => {},
onStart: (visit) => {},
onProgress: (progress) => {},
onSuccess: (page) => {},
onError: (errors) => {},
onFinish: (visit) => {},
onPrefetching: () => {},
onPrefetched: () => {},
})
```
\== React
```js
import { router } from '@inertiajs/react'
router.visit(url, {
method: 'get',
data: {},
replace: false,
preserveState: false,
preserveScroll: false,
only: [],
except: [],
headers: {},
errorBag: null,
forceFormData: false,
queryStringArrayFormat: 'brackets',
async: false,
showProgress: true,
fresh: false,
reset: [],
preserveUrl: false,
prefetch: false,
onCancelToken: (cancelToken) => {},
onCancel: () => {},
onBefore: (visit) => {},
onStart: (visit) => {},
onProgress: (progress) => {},
onSuccess: (page) => {},
onError: (errors) => {},
onFinish: (visit) => {},
onPrefetching: () => {},
onPrefetched: () => {},
})
```
\== Svelte 4|Svelte 5
```js
import { router } from '@inertiajs/svelte'
router.visit(url, {
method: 'get',
data: {},
replace: false,
preserveState: false,
preserveScroll: false,
only: [],
except: [],
headers: {},
errorBag: null,
forceFormData: false,
queryStringArrayFormat: 'brackets',
async: false,
showProgress: true,
fresh: false,
reset: [],
preserveUrl: false,
prefetch: false,
onCancelToken: (cancelToken) => {},
onCancel: () => {},
onBefore: (visit) => {},
onStart: (visit) => {},
onProgress: (progress) => {},
onSuccess: (page) => {},
onError: (errors) => {},
onFinish: (visit) => {},
onPrefetching: () => {},
onPrefetched: () => {},
})
```
:::
However, it's generally more convenient to use one of Inertia's shortcut request methods. These methods share all the same options as `router.visit()`.
:::tabs key:frameworks
\== Vue
```js
import { router } from '@inertiajs/vue3'
router.get(url, data, options)
router.post(url, data, options)
router.put(url, data, options)
router.patch(url, data, options)
router.delete(url, options)
router.reload(options) // Uses the current URL
```
\== React
```js
import { router } from '@inertiajs/react'
router.get(url, data, options)
router.post(url, data, options)
router.put(url, data, options)
router.patch(url, data, options)
router.delete(url, options)
router.reload(options) // Uses the current URL
```
\== Svelte 4|Svelte 5
```js
import { router } from '@inertiajs/svelte'
router.get(url, data, options)
router.post(url, data, options)
router.put(url, data, options)
router.patch(url, data, options)
router.delete(url, options)
router.reload(options) // Uses the current URL
```
:::
The `reload()` method is a convenient, shorthand method that automatically visits the current page with `preserveState` and `preserveScroll` both set to `true`, making it the perfect method to invoke when you just want to reload the current page's data.
## Method
When making manual visits, you may use the `method` option to set the request's HTTP method to `get`, `post`, `put`, `patch` or `delete`. The default method is `get`.
:::tabs key:frameworks
\== Vue
```js
import { router } from '@inertiajs/vue3'
router.visit(url, { method: 'post' })
```
\== React
```js
import { router } from '@inertiajs/react'
router.visit(url, { method: 'post' })
```
\== Svelte 4|Svelte 5
```js
import { router } from '@inertiajs/svelte'
router.visit(url, { method: 'post' })
```
:::
> \[!WARNING]
> Uploading files via `put` or `patch` is not supported in Rails. Instead, make the request via `post`, including a `_method` attribute or a `X-HTTP-METHOD-OVERRIDE` header set to `put` or `patch`. For more info see [`Rack::MethodOverride`](https://github.com/rack/rack/blob/main/lib/rack/method_override.rb).
# Data
You may use the `data` option to add data to the request.
:::tabs key:frameworks
\== Vue
```js
import { router } from '@inertiajs/vue3'
router.visit('/users', {
method: 'post',
data: {
name: 'John Doe',
email: 'john.doe@example.com',
},
})
```
\== React
```js
import { router } from '@inertiajs/react'
router.visit('/users', {
method: 'post',
data: {
name: 'John Doe',
email: 'john.doe@example.com',
},
})
```
\== Svelte 4|Svelte 5
```js
import { router } from '@inertiajs/svelte'
router.visit('/users', {
method: 'post',
data: {
name: 'John Doe',
email: 'john.doe@example.com',
},
})
```
:::
For convenience, the `get()`, `post()`, `put()`, and `patch()` methods all accept data as their second argument.
:::tabs key:frameworks
\== Vue
```js
import { router } from '@inertiajs/vue3'
router.post('/users', {
name: 'John Doe',
email: 'john.doe@example.com',
})
```
\== React
```js
import { router } from '@inertiajs/react'
router.post('/users', {
name: 'John Doe',
email: 'john.doe@example.com',
})
```
\== Svelte 4|Svelte 5
```js
```
import { router } from '@inertiajs/svelte'
router.post('/users', {
name: 'John Doe',
email: 'john.doe@example.com',
})
:::
## Custom headers
The `headers` option allows you to add custom headers to a request.
:::tabs key:frameworks
\== Vue
```js
import { router } from '@inertiajs/vue3'
router.post('/users', data, {
headers: {
'Custom-Header': 'value',
},
})
```
\== React
```js
import { router } from '@inertiajs/react'
router.post('/users', data, {
headers: {
'Custom-Header': 'value',
},
})
```
\== Svelte 4|Svelte 5
```js
import { router } from '@inertiajs/svelte'
router.post('/users', data, {
headers: {
'Custom-Header': 'value',
},
})
```
:::
> \[!NOTE]
> The headers Inertia uses internally to communicate its state to the server take priority and therefore cannot be overwritten.
## File uploads
When making visits / requests that include files, Inertia will automatically convert the request data into a `FormData` object. If you would like the request to always use a `FormData` object, you may use the `forceFormData` option.
:::tabs key:frameworks
\== Vue
```js
import { router } from '@inertiajs/vue3'
router.post('/companies', data, {
forceFormData: true,
})
```
\== React
```js
import { router } from '@inertiajs/react'
router.post('/companies', data, {
forceFormData: true,
})
```
\== Svelte 4|Svelte 5
```js
import { router } from '@inertiajs/svelte'
router.post('/companies', data, {
forceFormData: true,
})
```
:::
For more information on uploading files, please consult the dedicated [file uploads](/guide/file-uploads.md) documentation.
## Browser history
When making visits, Inertia automatically adds a new entry into the browser history. However, it's also possible to replace the current history entry by setting the `replace` option to `true`.
:::tabs key:frameworks
\== Vue
```js
import { router } from '@inertiajs/vue3'
router.get('/users', { search: 'John' }, { replace: true })
```
\== React
```js
import { router } from '@inertiajs/react'
router.get('/users', { search: 'John' }, { replace: true })
```
\== Svelte 4|Svelte 5
```js
import { router } from '@inertiajs/svelte'
router.get('/users', { search: 'John' }, { replace: true })
```
:::
> \[!NOTE]
> Visits made to the same URL automatically set `replace` to `true`.
# Client side visits
You can use the `router.push` and `router.replace` method to make client-side visits. This method is useful when you want to update the browser's history without making a server request.
:::tabs key:frameworks
\== Vue
```js
import { router } from '@inertiajs/vue3'
router.push({
url: '/users',
component: 'Users',
props: { search: 'John' },
clearHistory: false,
encryptHistory: false,
preserveScroll: false,
preserveState: false,
})
```
\== React
```js
import { router } from '@inertiajs/react'
router.push({
url: '/users',
component: 'Users',
props: { search: 'John' },
clearHistory: false,
encryptHistory: false,
preserveScroll: false,
preserveState: false,
})
```
\== Svelte 4|Svelte 5
```js
import { router } from '@inertiajs/svelte'
router.push({
url: '/users',
component: 'Users',
props: { search: 'John' },
clearHistory: false,
encryptHistory: false,
preserveScroll: false,
preserveState: false,
})
```
:::
All the parameters are optional. By default, all passed parameters will be merged with the current page. This means you are responsible for overriding the current page's URL, component, and props.
If you need access to the current page's props you can pass a function to the props option. This function will receive the current page's props as an argument and should return the new props.
:::tabs key:frameworks
\== Vue
```js
import { router } from '@inertiajs/vue3'
router.push({ url: '/users', component: 'Users' })
router.replace({
props: (currentProps) => ({ ...currentProps, search: 'John' }),
})
```
\== React
```js
import { router } from '@inertiajs/react'
router.push({ url: '/users', component: 'Users' })
router.replace({
props: (currentProps) => ({ ...currentProps, search: 'John' }),
})
```
\== Svelte 4|Svelte 5
```js
import { router } from '@inertiajs/svelte'
router.push({ url: '/users', component: 'Users' })
router.replace({
props: (currentProps) => ({ ...currentProps, search: 'John' }),
})
```
:::
> \[!NOTE]
> Make sure that any route you push on the client side is also defined on the server side. If the user refreshes the page, the server will need to know how to render the page.
## State preservation
By default, page visits to the same page create a fresh page component instance. This causes any local state, such as form inputs, scroll positions, and focus states to be lost.
However, in some situations, it's necessary to preserve the page component state. For example, when submitting a form, you need to preserve your form data in the event that form validation fails on the server.
For this reason, the `post`, `put`, `patch`, `delete`, and `reload` methods all set the `preserveState` option to `true` by default.
You can instruct Inertia to preserve the component's state when using the `get` method by setting the `preserveState` option to `true`.
:::tabs key:frameworks
\== Vue
```js
import { router } from '@inertiajs/vue3'
router.get('/users', { search: 'John' }, { preserveState: true })
```
\== React
```js
import { router } from '@inertiajs/react'
router.get('/users', { search: 'John' }, { preserveState: true })
```
\== Svelte 4|Svelte 5
```js
import { router } from '@inertiajs/svelte'
router.get('/users', { search: 'John' }, { preserveState: true })
```
:::
You can also lazily evaluate the `preserveState` option based on the response by providing a callback to the `preserveState` option.
If you'd like to only preserve state if the response includes validation errors, set the `preserveState` option to `"errors"`.
:::tabs key:frameworks
\== Vue
```js
import { router } from '@inertiajs/vue3'
router.get('/users', { search: 'John' }, { preserveState: 'errors' })
```
\== React
```js
import { router } from '@inertiajs/react'
router.get('/users', { search: 'John' }, { preserveState: 'errors' })
```
\== Svelte 4|Svelte 5
```js
import { router } from '@inertiajs/svelte'
router.get('/users', { search: 'John' }, { preserveState: 'errors' })
```
:::
You can also lazily evaluate the `preserveState` option based on the response by providing a callback.
:::tabs key:frameworks
\== Vue
```js
import { router } from '@inertiajs/vue3'
router.post('/users', data, {
preserveState: (page) => page.props.someProp === 'value',
})
```
\== React
```js
import { router } from '@inertiajs/react'
router.post('/users', data, {
preserveState: (page) => page.props.someProp === 'value',
})
```
\== Svelte 4|Svelte 5
```js
import { router } from '@inertiajs/svelte'
router.post('/users', data, {
preserveState: (page) => page.props.someProp === 'value',
})
```
:::
## Scroll preservation
When navigating between pages, Inertia mimics default browser behavior by automatically resetting the scroll position of the document body (as well as any [scroll regions](/guide/scroll-management.md#scroll-regions) you've defined) back to the top of the page.
You can disable this behaviour by setting the `preserveScroll` option to `false`.
:::tabs key:frameworks
\== Vue
```js
import { router } from '@inertiajs/vue3'
router.visit(url, { preserveScroll: false })
```
\== React
```js
import { router } from '@inertiajs/react'
router.visit(url, { preserveScroll: false })
```
\== Svelte 4|Svelte 5
```js
import { router } from '@inertiajs/svelte'
router.visit(url, { preserveScroll: false })
```
:::
If you'd like to only preserve the scroll position if the response includes validation errors, set the `preserveScroll` option to `"errors"`.
:::tabs key:frameworks
\== Vue
```js
import { router } from '@inertiajs/vue3'
router.visit(url, { preserveScroll: 'errors' })
```
\== React
```js
import { router } from '@inertiajs/react'
router.visit(url, { preserveScroll: 'errors' })
```
\== Svelte 4|Svelte 5
```js
import { router } from '@inertiajs/svelte'
router.visit(url, { preserveScroll: 'errors' })
```
:::
You can also lazily evaluate the `preserveScroll` option based on the response by providing a callback.
:::tabs key:frameworks
\== Vue
```js
import { router } from '@inertiajs/vue3'
router.post('/users', data, {
preserveScroll: (page) => page.props.someProp === 'value',
})
```
\== React
```js
import { router } from '@inertiajs/react'
router.post('/users', data, {
preserveScroll: (page) => page.props.someProp === 'value',
})
```
\== Svelte 4|Svelte 5
```js
import { router } from '@inertiajs/svelte'
router.post('/users', data, {
preserveScroll: (page) => page.props.someProp === 'value',
})
```
:::
For more information regarding this feature, please consult the [scroll management](/guide/scroll-management.md) documentation.
## Partial reloads
The `only` option allows you to request a subset of the props (data) from the server on subsequent visits to the same page, thus making your application more efficient since it does not need to retrieve data that the page is not interested in refreshing.
:::tabs key:frameworks
\== Vue
```js
import { router } from '@inertiajs/vue3'
router.get('/users', { search: 'John' }, { only: ['users'] })
```
\== React
```js
import { router } from '@inertiajs/react'
router.get('/users', { search: 'John' }, { only: ['users'] })
```
\== Svelte 4|Svelte 5
```js
import { router } from '@inertiajs/svelte'
router.get('/users', { search: 'John' }, { only: ['users'] })
```
:::
For more information on this feature, please consult the [partial reloads](/guide/partial-reloads.md) documentation.
## Visit cancellation
You can cancel a visit using a cancel token, which Inertia automatically generates and provides via the `onCancelToken()` callback prior to making the visit.
:::tabs key:frameworks
\== Vue
```js
import { router } from '@inertiajs/vue3'
router.post('/users', data, {
onCancelToken: (cancelToken) => (this.cancelToken = cancelToken),
})
// Cancel the visit...
this.cancelToken.cancel()
```
\== React
```js
import { router } from '@inertiajs/react'
router.post('/users', data, {
onCancelToken: (cancelToken) => (this.cancelToken = cancelToken),
})
// Cancel the visit...
this.cancelToken.cancel()
```
\== Svelte 4|Svelte 5
```js
import { router } from '@inertiajs/svelte'
router.post('/users', data, {
onCancelToken: (cancelToken) => (this.cancelToken = cancelToken),
})
// Cancel the visit...
this.cancelToken.cancel()
```
:::
The `onCancel()` and `onFinish()` event callbacks will be executed when a visit is cancelled.
## Event callbacks
In addition to Inertia's [global events](/guide/events.md), Inertia also provides a number of per-visit event callbacks.
:::tabs key:frameworks
\== Vue
```js
import { router } from '@inertiajs/vue3'
router.post('/users', data, {
onBefore: (visit) => {},
onStart: (visit) => {},
onProgress: (progress) => {},
onSuccess: (page) => {},
onError: (errors) => {},
onCancel: () => {},
onFinish: (visit) => {},
})
```
\== React
```js
import { router } from '@inertiajs/react'
router.post('/users', data, {
onBefore: (visit) => {},
onStart: (visit) => {},
onProgress: (progress) => {},
onSuccess: (page) => {},
onError: (errors) => {},
onCancel: () => {},
onFinish: (visit) => {},
})
```
\== Svelte 4|Svelte 5
```js
import { router } from '@inertiajs/svelte'
router.post('/users', data, {
onBefore: (visit) => {},
onStart: (visit) => {},
onProgress: (progress) => {},
onSuccess: (page) => {},
onError: (errors) => {},
onCancel: () => {},
onFinish: (visit) => {},
})
```
:::
Returning `false` from the `onBefore()` callback will cause the visit to be cancelled.
:::tabs key:frameworks
\== Vue
```js
import { router } from '@inertiajs/vue3'
router.delete(`/users/${user.id}`, {
onBefore: () => confirm('Are you sure you want to delete this user?'),
})
```
\== React
```js
import { router } from '@inertiajs/react'
router.delete(`/users/${user.id}`, {
onBefore: () => confirm('Are you sure you want to delete this user?'),
})
```
\== Svelte 4|Svelte 5
```js
import { router } from '@inertiajs/svelte'
router.delete(`/users/${user.id}`, {
onBefore: () => confirm('Are you sure you want to delete this user?'),
})
```
:::
It's also possible to return a promise from the `onSuccess()` and `onError()` callbacks. When doing so, the "finish" event will be delayed until the promise has resolved.
:::tabs key:frameworks
\== Vue
```js
import { router } from '@inertiajs/vue3'
router.post(url, {
onSuccess: () => {
return Promise.all([this.doThing(), this.doAnotherThing()])
},
onFinish: (visit) => {
// This won't be called until doThing()
// and doAnotherThing() have finished.
},
})
```
\== React
```js
import { router } from '@inertiajs/react'
router.post(url, {
onSuccess: () => {
return Promise.all([this.doThing(), this.doAnotherThing()])
},
onFinish: (visit) => {
// This won't be called until doThing()
// and doAnotherThing() have finished.
},
})
```
\== Svelte 4|Svelte 5
```js
import { router } from '@inertiajs/svelte'
router.post(url, {
onSuccess: () => {
return Promise.all([this.doThing(), this.doAnotherThing()])
},
onFinish: (visit) => {
// This won't be called until doThing()
// and doAnotherThing() have finished.
},
})
```
:::
---
---
url: /guide/merging-props.md
---
# Merging props
By default, Inertia overwrites props with the same name when reloading a page. However, there are instances, such as pagination or infinite scrolling, where that is not the desired behavior. In these cases, you can merge props instead of overwriting them.
## Server side
> `deep_merge` requires `@inertiajs/core` v2.0.8 or higher, and `inertia_rails` v3.8.0 or higher.
To specify that a prop should be merged, use the `merge` or `deep_merge` method on the prop's value.
Use `merge` for merging simple arrays, and `deep_merge` for handling nested objects that include arrays or complex structures, such as pagination objects.
```ruby
class UsersController < ApplicationController
include Pagy::Backend
def index
pagy, records = pagy(User.all)
render inertia: {
# simple array:
users: InertiaRails.merge { records.as_json(...) },
# pagination object:
data: InertiaRails.deep_merge {
{
records: records.as_json(...),
pagy: pagy_metadata(pagy)
}
}
}
end
end
```
On the client side, Inertia detects that this prop should be merged. If the prop returns an array, it will append the response to the current prop value. If it's an object, it will merge the response with the current prop value. If you have opted to `deepMerge`, Inertia ensures a deep merge of the entire structure.
**Of note:** During the merging process, if the value is an array, the incoming items will be *appended* to the existing array, not merged by index.
You can also combine [deferred props](/guide/deferred-props) with mergeable props to defer the loading of the prop and ultimately mark it as mergeable once it's loaded.
```ruby
class UsersController < ApplicationController
include Pagy::Backend
def index
pagy, records = pagy(User.all)
render inertia: {
# simple array:
users: InertiaRails.defer(merge: true) { records.as_json(...) },
# pagination object:
data: InertiaRails.defer(deep_merge: true) {
{
records: records.as_json(...),
pagy: pagy_metadata(pagy)
}
}
}
end
end
```
## Resetting props
On the client side, you can indicate to the server that you would like to reset the prop. This is useful when you want to clear the prop value before merging new data, such as when the user enters a new search query on a paginated list.
The `reset` request option accepts an array of the props keys you would like to reset.
:::tabs key:frameworks
\== Vue
```js
import { router } from '@inertiajs/vue3'
router.reload({ reset: ['users'] })
```
\== React
```js
import { router } from '@inertiajs/react'
router.reload({ reset: ['users'] })
```
\== Svelte 4|Svelte 5
```js
import { router } from '@inertiajs/svelte'
router.reload({ reset: ['users'] })
```
:::
---
---
url: /guide/pages.md
---
# Pages
When building applications using Inertia, each page in your application typically has its own controller / route and a corresponding JavaScript component. This allows you to retrieve just the data necessary for that page - no API required.
In addition, all of the data needed for the page can be retrieved before the page is ever rendered by the browser, eliminating the need for displaying "loading" states when users visit your application.
## Creating pages
Inertia pages are simply JavaScript components. If you have ever written a Vue, React, or Svelte component, you will feel right at home. As you can see in the example below, pages receive data from your application's controllers as props.
:::tabs key:frameworks
\== Vue
```vue
Welcome
Hello {{ user.name }}, welcome to your first Inertia app!
```
\== React
```jsx
import Layout from '../Layout'
import { Head } from '@inertiajs/react'
export default function Welcome({ user }) {
return (
Welcome
Hello {user.name}, welcome to your first Inertia app!
)
}
```
\== Svelte 4
```svelte
Welcome
Welcome
Hello {user.name}, welcome to your first Inertia app!
```
\== Svelte 5
```svelte
Welcome
Welcome
Hello {user.name}, welcome to your first Inertia app!
```
:::
Given the page above, you can render the page by returning an Inertia response from a controller or route. In this example, let's assume this page is stored at `app/frontend/pages/User/Show.(jsx|vue|svelte)` within a Rails application.
```ruby
class UsersController < ApplicationController
def show
user = User.find(params[:id])
render inertia: 'User/Show', props: { user: }
end
end
```
See [the responses documentation](/guide/responses) for more information on how to return Inertia responses from your controllers.
## Creating layouts
While not required, for most projects it makes sense to create a site layout that all of your pages can extend. You may have noticed in our page example above that we're wrapping the page content within a `` component. Here's an example of such a component:
:::tabs key:frameworks
\== Vue
```vue
Home
About
Contact
```
\== React
```jsx
import { Link } from '@inertiajs/react'
export default function Layout({ children }) {
return (
Home
About
Contact
{children}
)
}
```
\== Svelte 4
```svelte
HomeAboutContact
```
\== Svelte 5
```svelte
HomeAboutContact
{@render children()}
```
:::
As you can see, there is nothing Inertia specific within this template. This is just a typical component.
## Persistent layouts
While it's simple to implement layouts as children of page components, it forces the layout instance to be destroyed and recreated between visits. This means you cannot have persistent layout state when navigating between pages.
For example, maybe you have an audio player on a podcast website that you want to continue playing as users navigate the site. Or, maybe you simply want to maintain the scroll position in your sidebar navigation between page visits. In these situations, the solution is to leverage Inertia's persistent layouts.
:::tabs key:frameworks
\== Vue
```vue
Welcome
Hello {{ user.name }}, welcome to your first Inertia app!
```
\== React
```jsx
import Layout from '../Layout'
const Home = ({ user }) => {
return (
<>
Welcome
Hello {user.name}, welcome to your first Inertia app!
Hello {user.name}, welcome to your first Inertia app!
```
\== Svelte 5
```svelte
Welcome
Hello {user.name}, welcome to your first Inertia app!
```
:::
You can also create more complex layout arrangements using nested layouts.
:::tabs key:frameworks
\== Vue
```vue
Welcome
Hello {{ user.name }}, welcome to your first Inertia app!
```
If you're using Vue 3.3+, you can alternatively use [`defineOptions`](https://vuejs.org/api/sfc-script-setup.html#defineoptions) to define a layout within `
```
\== React
```jsx
import SiteLayout from './SiteLayout'
import NestedLayout from './NestedLayout'
const Home = ({ user }) => {
return (
<>
Welcome
Hello {user.name}, welcome to your first Inertia app!
Hello {user.name}, welcome to your first Inertia app!
```
\== Svelte 5
```svelte
Welcome
Hello {user.name}, welcome to your first Inertia app!
```
:::
## Default layouts
If you're using persistent layouts, you may find it convenient to define the default page layout in the `resolve()` callback of your application's main JavaScript file.
:::tabs key:frameworks
\== Vue
```js
// frontend/entrypoints/inertia.js
import Layout from '../Layout'
createInertiaApp({
resolve: (name) => {
const pages = import.meta.glob('../pages/**/*.vue', { eager: true })
let page = pages[`../pages/${name}.vue`]
page.default.layout = page.default.layout || Layout
return page
},
// ...
})
```
\== React
```js
// frontend/entrypoints/inertia.js
import Layout from '../Layout'
createInertiaApp({
resolve: (name) => {
const pages = import.meta.glob('../pages/**/*.jsx', { eager: true })
let page = pages[`../pages/${name}.jsx`]
page.default.layout =
page.default.layout || ((page) => )
return page
},
// ...
})
```
\== Svelte 4|Svelte 5
```js
// frontend/entrypoints/inertia.js
import Layout from '../Layout'
createInertiaApp({
resolve: (name) => {
const pages = import.meta.glob('../pages/**/*.svelte', { eager: true })
let page = pages[`../pages/${name}.svelte`]
return { default: page.default, layout: page.layout || Layout }
},
// ...
})
```
:::
This will automatically set the page layout to `Layout` if a layout has not already been set for that page.
You can even go a step further and conditionally set the default page layout based on the page `name`, which is available to the `resolve()` callback. For example, maybe you don't want the default layout to be applied to your public pages.
:::tabs key:frameworks
\== Vue
```js
// frontend/entrypoints/inertia.js
import Layout from '../Layout'
createInertiaApp({
resolve: (name) => {
const pages = import.meta.glob('../pages/**/*.vue', { eager: true })
let page = pages[`../pages/${name}.vue`]
page.default.layout = name.startsWith('Public/') ? undefined : Layout
return page
},
// ...
})
```
\== React
```js
// frontend/entrypoints/inertia.js
import Layout from '../Layout'
createInertiaApp({
resolve: (name) => {
const pages = import.meta.glob('../pages/**/*.jsx', { eager: true })
let page = pages[`../pages/${name}.jsx`]
page.default.layout = name.startsWith('Public/')
? undefined
: (page) =>
return page
},
// ...
})
```
\== Svelte 4|Svelte 5
```js
// frontend/entrypoints/inertia.js
import Layout from '../Layout'
createInertiaApp({
resolve: (name) => {
const pages = import.meta.glob('../pages/**/*.svelte', { eager: true })
let page = pages[`../pages/${name}.svelte`]
return {
default: page.default,
layout: name.startsWith('Public/') ? undefined : Layout,
}
},
// ...
})
```
:::
---
---
url: /guide/partial-reloads.md
---
# Partial reloads
When making visits to the same page you are already on, it's not always necessary to re-fetch all of the page's data from the server. In fact, selecting only a subset of the data can be a helpful performance optimization if it's acceptable that some page data becomes stale. Inertia makes this possible via its "partial reload" feature.
As an example, consider a "user index" page that includes a list of users, as well as an option to filter the users by their company. On the first request to the page, both the `users` and `companies` props are passed to the page component. However, on subsequent visits to the same page (maybe to filter the users), you can request only the `users` data from the server without requesting the `companies` data. Inertia will then automatically merge the partial data returned from the server with the data it already has in memory client-side.
> \[!NOTE]
> Partial reloads only work for visits made to the same page component.
## Only certain props
To perform a partial reload, use the `only` visit option to specify which data the server should return. This option should be an array of keys which correspond to the keys of the props.
:::tabs key:frameworks
\== Vue
```js
import { router } from '@inertiajs/vue3'
router.visit(url, {
only: ['users'],
})
```
\== React
```jsx
import { router } from '@inertiajs/react'
router.visit(url, {
only: ['users'],
})
```
\== Svelte 4|Svelte 5
```js
import { router } from '@inertiajs/svelte'
router.visit(url, {
only: ['users'],
})
```
:::
## Except certain props
In addition to the only visit option you can also use the except option to specify which data the server should exclude. This option should also be an array of keys which correspond to the keys of the props.
:::tabs key:frameworks
\== Vue
```js
import { router } from '@inertiajs/vue3'
router.visit(url, {
except: ['users'],
})
```
\== React
```jsx
import { router } from '@inertiajs/react'
router.visit(url, {
except: ['users'],
})
```
\== Svelte 4|Svelte 5
```js
import { router } from '@inertiajs/svelte'
router.visit(url, {
except: ['users'],
})
```
:::
## Dot notation
Both the `only` and `except` visit options support dot notation to specify nested data, and they can be used together. In the following example, only `settings.theme` will be rendered, but without its `colors` property.
:::tabs key:frameworks
\== Vue
```js
import { router } from '@inertiajs/vue3'
router.visit(url, {
only: ['settings.theme'],
except: ['setting.theme.colors'],
})
```
\== React
```jsx
import { router } from '@inertiajs/react'
router.visit(url, {
only: ['settings.theme'],
except: ['setting.theme.colors'],
})
```
\== Svelte 4|Svelte 5
```js
import { router } from '@inertiajs/svelte'
router.visit(url, {
only: ['settings.theme'],
except: ['setting.theme.colors'],
})
```
:::
Please remember that, by design, partial reloading filters props *before* they are evaluated, so it can only target explicitly defined prop keys. Let's say you have this prop:
`users: -> { User.all }`
Requesting `only: ['users.name']` will exclude the entire `users` prop, since `users.name` is not available before evaluating the prop.
Requesting `except: ['users.name']` will not exclude anything.
## Router shorthand
Since partial reloads can only be made to the same page component the user is already on, it almost always makes sense to just use the `router.reload()` method, which automatically uses the current URL.
:::tabs key:frameworks
\== Vue
```js
import { router } from '@inertiajs/vue3'
router.reload({ only: ['users'] })
```
\== React
```js
import { router } from '@inertiajs/react'
router.reload({ only: ['users'] })
```
\== Svelte 4|Svelte 5
```js
import { router } from '@inertiajs/svelte'
router.reload({ only: ['users'] })
```
:::
## Using links
It's also possible to perform partial reloads with Inertia links using the `only` property.
:::tabs key:frameworks
\== Vue
```vue
Show active
```
\== React
```jsx
import { Link } from '@inertiajs/react'
export default () => (
Show active
)
```
\== Svelte 4|Svelte 5
```svelte
Show active
Show active
```
:::
## Lazy data evaluation
For partial reloads to be most effective, be sure to also use lazy data evaluation when returning props from your server-side routes or controllers. This can be accomplished by wrapping all optional page data in a lambda.
```ruby
class UsersController < ApplicationController
def index
render inertia: 'Users/Index', props: {
users: -> { User.all },
companies: -> { Company.all },
}
end
end
```
When Inertia performs a request, it will determine which data is required and only then will it evaluate the closure. This can significantly increase the performance of pages that contain a lot of optional data.
Additionally, Inertia provides an `InertiaRails.optional` method to specify that a prop should never be included unless explicitly requested using the `only` option:
```ruby
class UsersController < ApplicationController
def index
render inertia: 'Users/Index', props: {
users: InertiaRails.optional { User.all },
}
end
end
```
> \[!NOTE]
> Prior to Inertia.js v2, the method `InertiaRails.lazy` was used. It is now deprecated and has been replaced by `InertiaRails.optional`. Please update your code accordingly to ensure compatibility with the latest version.
On the inverse, you can use the `InertiaRails.always` method to specify that a prop should always be included, even if it has not been explicitly required in a partial reload.
```ruby
class UsersController < ApplicationController
def index
render inertia: 'Users/Index', props: {
users: InertiaRails.always { User.all },
}
end
end
```
Here's a summary of each approach:
```ruby
class UsersController < ApplicationController
def index
render inertia: 'Users/Index', props: {
# ALWAYS included on standard visits
# OPTIONALLY included on partial reloads
# ALWAYS evaluated
users: User.all,
# ALWAYS included on standard visits
# OPTIONALLY included on partial reloads
# ONLY evaluated when needed
users: -> { User.all },
# NEVER included on standard visits
# OPTIONALLY included on partial reloads
# ONLY evaluated when needed
users: InertiaRails.optional { User.all },
# ALWAYS included on standard visits
# ALWAYS included on partial reloads
# ALWAYS evaluated
users: InertiaRails.always { User.all },
}
end
end
```
---
---
url: /guide/polling.md
---
# Polling
## Poll helper
Polling your server for new information on the current page is common, so Inertia provides a poll helper designed to help reduce the amount of boilerplate code. In addition, the poll helper will automatically stop polling when the page is unmounted.
The only required argument is the polling interval in milliseconds.
:::tabs key:frameworks
\== Vue
```js
import { usePoll } from '@inertiajs/vue3'
usePoll(2000)
```
\== React
```js
import { usePoll } from '@inertiajs/react'
usePoll(2000)
```
\== Svelte 4|Svelte 5
```js
import { usePoll } from '@inertiajs/svelte'
usePoll(2000)
```
:::
If you need to pass additional request options to the poll helper, you can pass any of the `router.reload` options as the second parameter.
:::tabs key:frameworks
\== Vue
```js
import { usePoll } from '@inertiajs/vue3'
usePoll(2000, {
onStart() {
console.log('Polling request started')
},
onFinish() {
console.log('Polling request finished')
},
})
```
\== React
```js
import { usePoll } from '@inertiajs/react'
usePoll(2000, {
onStart() {
console.log('Polling request started')
},
onFinish() {
console.log('Polling request finished')
},
})
```
\== Svelte 4|Svelte 5
```js
import { usePoll } from '@inertiajs/svelte'
usePoll(2000, {
onStart() {
console.log('Polling request started')
},
onFinish() {
console.log('Polling request finished')
},
})
```
:::
If you'd like more control over the polling behavior, the poll helper provides `stop` and `start` methods that allow you to manually start and stop polling. You can pass the `autoStart: false` option to the poll helper to prevent it from automatically starting polling when the component is mounted.
:::tabs key:frameworks
\== Vue
```vue
```
\== React
```jsx
import { usePoll } from '@inertiajs/react'
export default () => {
const { start, stop } = usePoll(
2000,
{},
{
autoStart: false,
},
)
return (
)
}
```
\== Svelte 4|Svelte 5
```svelte
```
:::
## Throttling
By default, the poll helper will throttle requests by 90% when the browser tab is in the background. If you'd like to disable this behavior, you can pass the `keepAlive` option to the poll helper.
:::tabs key:frameworks
\== Vue
```js
import { usePoll } from '@inertiajs/vue3'
usePoll(
2000,
{},
{
keepAlive: true,
},
)
```
\== React
```js
import { usePoll } from '@inertiajs/react'
usePoll(
2000,
{},
{
keepAlive: true,
},
)
```
\== Svelte 4|Svelte 5
```js
import { usePoll } from '@inertiajs/svelte'
usePoll(
2000,
{},
{
keepAlive: true,
},
)
```
:::
---
---
url: /guide/prefetching.md
---
# Prefetching
Inertia supports prefetching data for pages that are likely to be visited next. This can be useful for improving the perceived performance of your app by allowing the data to be fetched in the background while the user is still interacting with the current page.
## Link prefetching
To prefetch data for a page, you can use the `prefetch` method on the Inertia link component. By default, Inertia will prefetch the data for the page when the user hovers over the link after more than 75ms.
:::tabs key:frameworks
\== Vue
```vue
Users
```
\== React
```jsx
import { Link } from '@inertiajs/react'
export default () => (
Users
)
```
\== Svelte 4|Svelte 5
```svelte
Users
```
:::
By default, data is cached for 30 seconds before being evicted. You can customize this behavior by passing a `cacheFor` prop to the `Link` component.
:::tabs key:frameworks
\== Vue
```vue
Users
Users
Users
```
\== React
```jsx
import { Link } from '@inertiajs/react'
export default () => (
<>
Users
Users
Users
)
```
\== Svelte 4|Svelte 5
```svelte
UsersUsersUsers
```
:::
You can also start prefetching on `mousedown` by passing the `click` value to the `prefetch` prop.
:::tabs key:frameworks
\== Vue
```vue
Users
```
\== React
```jsx
import { Link } from '@inertiajs/react'
export default () => (
Users
)
```
\== Svelte 4|Svelte 5
```svelte
Users
```
:::
If you're confident that the user will visit a page next, you can prefetch the data on mount as well.
:::tabs key:frameworks
\== Vue
```vue
Users
```
\== React
```jsx
import { Link } from '@inertiajs/react'
export default () => (
Users
)
```
\== Svelte 4|Svelte 5
```svelte
Users
```
:::
You can also combine strategies by passing an array of values to the `prefetch` prop.
:::tabs key:frameworks
\== Vue
```vue
Users
```
\== React
```jsx
import { Link } from '@inertiajs/react'
export default () => (
Users
)
```
\== Svelte 4|Svelte 5
```svelte
Users
```
:::
## Programmatic prefetching
You can also prefetch data programmatically using `router.prefetch`. The signature is identical to `router.visit` with the exception of a third argument that allows you to specify prefetch options.
When the `cacheFor` option is not specified, it defaults to 30 seconds.
```js
router.prefetch('/users', { method: 'get', data: { page: 2 } })
router.prefetch(
'/users',
{ method: 'get', data: { page: 2 } },
{ cacheFor: '1m' },
)
```
To make this even easier, Inertia offers a prefetch helper. This helper provides some additional insight into the request, such as the last updated timestamp and if the request is currently prefetching.
:::tabs key:frameworks
\== Vue
```js
import { usePrefetch } from '@inertiajs/vue3'
const { lastUpdatedAt, isPrefetching, isPrefetched } = usePrefetch(
'/users',
{ method: 'get', data: { page: 2 } },
{ cacheFor: '1m' },
)
```
\== React
```js
import { usePrefetch } from '@inertiajs/react'
const { lastUpdatedAt, isPrefetching, isPrefetched } = usePrefetch(
'/users',
{ method: 'get', data: { page: 2 } },
{ cacheFor: '1m' },
)
```
\== Svelte 4|Svelte 5
```js
import { usePrefetch } from '@inertiajs/svelte'
const { lastUpdatedAt, isPrefetching, isPrefetched } = usePrefetch(
'/users',
{ method: 'get', data: { page: 2 } },
{ cacheFor: '1m' },
)
```
:::
## Flushing prefetch cache
You can flush the prefetch cache by calling `router.flushAll`. This will remove all cached data for all pages.
If you want to flush the cache for a specific page, you can pass the page URL and options to the `router.flush` method.
Furthermore, if you are using the prefetch helper, it will return a `flush` method for you to use for that specific page.
```js
// Flush all prefetch cache
router.flushAll()
// Flush cache for a specific page
router.flush('/users', { method: 'get', data: { page: 2 } })
// Flush cache for a specific page
const { flush } = usePrefetch('/users', { method: 'get', data: { page: 2 } })
flush()
```
## Stale while revalidate
By default, Inertia will fetch a fresh copy of the data when the user visits the page if the cached data is older than the cache duration. You can customize this behavior by passing a tuple to the `cacheFor` prop.
The first value in the array represents the number of seconds the cache is considered fresh, while the second value defines how long it can be served as stale data before fetching data from the server is necessary.
:::tabs key:frameworks
\== Vue
```vue
Users
```
\== React
```jsx
import { Link } from '@inertiajs/react'
export default () => (
Users
)
```
\== Svelte 4|Svelte 5
```svelte
Users
```
:::
### How it works
If a request is made within the fresh period (before the first value), the cache is returned immediately without making a request to the server.
If a request is made during the stale period (between the two values), the stale value is served to the user, and a request is made in the background to refresh the cached value. Once the value is returned, the data is merged into the page so the user has the most recent data.
If a request is made after the second value, the cache is considered expired, and the value is fetched from the sever as a regular request.
---
---
url: /guide/progress-indicators.md
---
# Progress indicators
Since Inertia requests are made via XHR, there would typically not be a browser loading indicator when navigating from one page to another. To solve this, Inertia displays a progress indicator at the top of the page whenever you make an Inertia visit. However, [asynchronous requests](#visit-options) do not show the progress indicator unless explicitly configured.
Of course, if you prefer, you can disable Inertia's default loading indicator and provide your own custom implementation. We'll discuss both approaches below.
## Default
Inertia's default progress indicator is a light-weight wrapper around the [NProgress](https://ricostacruz.com/nprogress/) library. You can customize it via the `progress` property of the `createInertiaApp()` function.
```js
createInertiaApp({
progress: {
// The delay after which the progress bar will appear, in milliseconds...
delay: 250,
// The color of the progress bar...
color: '#29d',
// Whether to include the default NProgress styles...
includeCSS: true,
// Whether the NProgress spinner will be shown...
showSpinner: false,
},
// ...
})
```
You can disable Inertia's default loading indicator by setting the `progress` property to `false`.
```js
createInertiaApp({
progress: false,
// ...
})
```
## Custom
It's also possible to setup your own custom page loading indicators using [Inertia events](/guide/events.md). Let's explore how to do this using the [NProgress](https://ricostacruz.com/nprogress/) library as an example.
First, disable Inertia's default loading indicator.
```js
createInertiaApp({
progress: false,
// ...
})
```
Next, install the NProgress library.
```shell
npm install nprogress
```
After installation, you'll need to add the [NProgress styles](https://github.com/rstacruz/nprogress/blob/master/nprogress.css) to your project. You can do this using a CDN hosted copy of the styles.
```html
```
Next, import both `NProgress` and the Inertia `router` into your application.
:::tabs key:frameworks
\== Vue
```js
import NProgress from 'nprogress'
import { router } from '@inertiajs/vue3'
```
\== React
```js
import NProgress from 'nprogress'
import { router } from '@inertiajs/react'
```
\== Svelte 4|Svelte 5
```js
import NProgress from 'nprogress'
import { router } from '@inertiajs/svelte'
```
:::
Next, let's add a `start` event listener. We'll use this listener to show the progress bar when a new Inertia visit begins.
```js
router.on('start', () => NProgress.start())
```
Then, let's add a `finish` event listener to hide the progress bar when the page visit finishes.
```js
router.on('finish', () => NProgress.done())
```
That's it! Now, as you navigate from one page to another, the progress bar will be added and removed from the page.
### Handling cancelled visits
While this custom progress implementation works great for page visits that finish properly, it would be nice to handle cancelled visits as well. First, for interrupted visits (those that get cancelled as a result of a new visit), the progress bar should simply be reset back to the start position. Second, for manually cancelled visits, the progress bar should be immediately removed from the page.
We can accomplish this by inspecting the `event.detail.visit` object that's provided to the finish event.
```js
router.on('finish', (event) => {
if (event.detail.visit.completed) {
NProgress.done()
} else if (event.detail.visit.interrupted) {
NProgress.set(0)
} else if (event.detail.visit.cancelled) {
NProgress.done()
NProgress.remove()
}
})
```
### File upload progress
Let's take this a step further. When files are being uploaded, it would be great to update the loading indicator to reflect the upload progress. This can be done using the `progress` event.
```js
router.on('progress', (event) => {
if (event.detail.progress.percentage) {
NProgress.set((event.detail.progress.percentage / 100) * 0.9)
}
})
```
Now, instead of the progress bar "trickling" while the files are being uploaded, it will actually update it's position based on the progress of the request. We limit the progress here to 90%, since we still need to wait for a response from the server.
### Loading indicator delay
The last thing we're going to implement is a loading indicator delay. It's often preferable to delay showing the loading indicator until a request has taken longer than 250-500 milliseconds. This prevents the loading indicator from appearing constantly on quick page visits, which can be visually distracting.
To implement the delay behavior, we'll use the `setTimeout` and `clearTimeout` functions. Let's start by defining a variable to keep track of the timeout.
```js
let timeout = null
```
Next, let's update the `start` event listener to start a new timeout that will show the progress bar after 250 milliseconds.
```js
router.on('start', () => {
timeout = setTimeout(() => NProgress.start(), 250)
})
```
Next, we'll update the `finish` event listener to clear any existing timeouts in the event that the page visit finishes before the timeout does.
```js
router.on('finish', (event) => {
clearTimeout(timeout)
// ...
})
```
In the `finish` event listener, we need to determine if the progress bar has actually started displaying progress, otherwise we'll inadvertently cause it to show before the timeout has finished.
```js
router.on('finish', (event) => {
clearTimeout(timeout)
if (!NProgress.isStarted()) {
return
}
// ...
})
```
And, finally, we need to do the same check in the `progress` event listener.
```js
router.on('progress', event => {
if (!NProgress.isStarted()) {
return
}
// ...
}
```
That's it, you now have a beautiful custom page loading indicator!
### Complete example
For convenience, here is the full source code of the final version of our custom loading indicator.
:::tabs key:frameworks
\== Vue
```js
import NProgress from 'nprogress'
import { router } from '@inertiajs/vue3'
let timeout = null
router.on('start', () => {
timeout = setTimeout(() => NProgress.start(), 250)
})
router.on('progress', (event) => {
if (NProgress.isStarted() && event.detail.progress.percentage) {
NProgress.set((event.detail.progress.percentage / 100) * 0.9)
}
})
router.on('finish', (event) => {
clearTimeout(timeout)
if (!NProgress.isStarted()) {
return
} else if (event.detail.visit.completed) {
NProgress.done()
} else if (event.detail.visit.interrupted) {
NProgress.set(0)
} else if (event.detail.visit.cancelled) {
NProgress.done()
NProgress.remove()
}
})
```
\== React
```js
import NProgress from 'nprogress'
import { router } from '@inertiajs/react'
let timeout = null
router.on('start', () => {
timeout = setTimeout(() => NProgress.start(), 250)
})
router.on('progress', (event) => {
if (NProgress.isStarted() && event.detail.progress.percentage) {
NProgress.set((event.detail.progress.percentage / 100) * 0.9)
}
})
router.on('finish', (event) => {
clearTimeout(timeout)
if (!NProgress.isStarted()) {
return
} else if (event.detail.visit.completed) {
NProgress.done()
} else if (event.detail.visit.interrupted) {
NProgress.set(0)
} else if (event.detail.visit.cancelled) {
NProgress.done()
NProgress.remove()
}
})
```
\== Svelte 4|Svelte 5
```js
import NProgress from 'nprogress'
import { router } from '@inertiajs/svelte'
let timeout = null
router.on('start', () => {
timeout = setTimeout(() => NProgress.start(), 250)
})
router.on('progress', (event) => {
if (NProgress.isStarted() && event.detail.progress.percentage) {
NProgress.set((event.detail.progress.percentage / 100) * 0.9)
}
})
router.on('finish', (event) => {
clearTimeout(timeout)
if (!NProgress.isStarted()) {
return
} else if (event.detail.visit.completed) {
NProgress.done()
} else if (event.detail.visit.interrupted) {
NProgress.set(0)
} else if (event.detail.visit.cancelled) {
NProgress.done()
NProgress.remove()
}
})
```
:::
## Visit Options
In addition to these configurations, Inertia.js provides two visit options to control the loading indicator on a per-request basis: `showProgress` and `async`. These options offer greater control over how Inertia.js handles asynchronous requests and manages progress indicators.
### `showProgress`
The `showProgress` option provides fine-grained control over the visibility of the loading indicator during requests.
```js
router.get('/settings', {}, { showProgress: false })
```
### `async`
The `async` option allows you to perform asynchronous requests without displaying the default progress indicator. It can be used in combination with the `showProgress` option.
```js
// Disable the progress indicator
router.get('/settings', {}, { async: true })
// Enable the progress indicator with async requests
router.get('/settings', {}, { async: true, showProgress: true })
```
---
---
url: /guide/redirects.md
---
# Redirects
When making a non-GET Inertia request manually or via a `` element, you should ensure that you always respond with a proper Inertia redirect response.
For example, if your controller is creating a new user, your "create" endpoint should return a redirect back to a standard `GET` endpoint, such as your user "index" page. Inertia will automatically follow this redirect and update the page accordingly.
```ruby
class UsersController < ApplicationController
def create
user = User.new(user_params)
if user.save
redirect_to users_url
else
redirect_to new_user_url, inertia: { errors: user.errors }
end
end
private
def user_params
params.require(:user).permit(:name, :email)
end
end
```
## 303 response code
When redirecting after a `PUT`, `PATCH`, or `DELETE` request, you must use a `303` response code, otherwise the subsequent request will not be treated as a `GET` request. A `303` redirect is very similar to a `302` redirect; however, the follow-up request is explicitly changed to a `GET` request.
If you're using one of our official server-side adapters, all redirects will automatically be converted to `303` redirects.
## External redirects
Sometimes it's necessary to redirect to an external website, or even another non-Inertia endpoint in your app while handling an Inertia request. This can be accomplished using a server-side initiated `window.location` visit via the `inertia_location` method.
```ruby
inertia_location index_path
```
The `inertia_location` method will generate a `409 Conflict` response and include the destination URL in the `X-Inertia-Location` header. When this response is received client-side, Inertia will automatically perform a `window.location = url` visit.
---
---
url: /guide/remembering-state.md
---
# Remembering state
When navigating browser history, Inertia restores pages using prop data cached in history state. However, Inertia does not restore local page component state since this is beyond its reach. This can lead to outdated pages in your browser history.
For example, if a user partially completes a form, then navigates away, and then returns back, the form will be reset and their work will be lost.
To mitigate this issue, you can tell Inertia which local component state to save in the browser history.
## Saving local state
To save local component state to the history state, use the "useRemember" hook to tell Inertia which data it should remember.
:::tabs key:frameworks
\== Vue
```js
import { useRemember } from '@inertiajs/vue3'
const form = useRemember({
first_name: null,
last_name: null,
})
```
\== React
```js
import { useRemember } from '@inertiajs/react'
export default function Profile() {
const [formState, setFormState] = useRemember({
first_name: null,
last_name: null,
// ...
})
// ...
}
```
\== Svelte 4|Svelte 5
```js
import { useRemember } from '@inertiajs/svelte'
const form = useRemember({
first_name: null,
last_name: null,
})
// ...
```
:::
Now, whenever your local `form` state changes, Inertia will automatically save this data to the history state and will also restore it on history navigation.
## Multiple components
If your page contains multiple components that use the remember functionality provided by Inertia, you need to provide a unique key for each component so that Inertia knows which data to restore to each component.
:::tabs key:frameworks
\== Vue
```js
import { useRemember } from '@inertiajs/vue3'
const form = useRemember(
{
first_name: null,
last_name: null,
},
'Users/Create',
)
```
\== React
```js
import { useRemember } from '@inertiajs/react'
export default function Profile() {
const [formState, setFormState] = useRemember(
{
first_name: null,
last_name: null,
},
'Users/Create',
)
}
```
\== Svelte 4|Svelte 5
```js
import { page, useRemember } from '@inertiajs/svelte'
let form = useRemember(
{
first_name: null,
last_name: null,
},
'Users/Create',
)
```
:::
If you have multiple instances of the same component on the page using the remember functionality, be sure to also include a unique key for each component instance, such as a model identifier.
:::tabs key:frameworks
\== Vue
```js
import { useRemember } from '@inertiajs/vue3'
const props = defineProps({ user: Object })
const form = useRemember(
{
first_name: null,
last_name: null,
},
`Users/Edit:${props.user.id}`,
)
```
\== React
```js
import { useRemember } from '@inertiajs/react'
export default function Profile() {
const [formState, setFormState] = useRemember(
{
first_name: props.user.first_name,
last_name: props.user.last_name,
},
`Users/Edit:${this.user.id}`,
)
}
```
\== Svelte 4|Svelte 5
```js
import { page, useRemember } from '@inertiajs/svelte'
let form = useRemember(
{
first_name: $page.props.user.first_name,
last_name: $page.props.user.last_name,
},
`Users/Edit:${$page.props.user.id}`,
)
```
:::
## Form helper
If you're using the Inertia [form helper](/guide/forms.md#form-helper), you can pass a unique form key as the first argument when instantiating your form. This will cause the form data and errors to automatically be remembered.
:::tabs key:frameworks
\== Vue
```js
import { useForm } from '@inertiajs/vue3'
const form = useForm('CreateUser', data)
const form = useForm(`EditUser:${props.user.id}`, data)
```
\== React
```js
import { useForm } from '@inertiajs/react'
const form = useForm('CreateUser', data)
const form = useForm(`EditUser:${user.id}`, data)
```
\== Svelte 4|Svelte 5
```js
import { useForm } from '@inertiajs/svelte'
const form = useForm('CreateUser', data)
const form = useForm(`EditUser:${user.id}`, data)
```
:::
## Manually saving state
The `useRemember` hook watches for data changes and automatically saves them to the history state. When navigating back to the page, Inertia will restore this data.
However, it's also possible to manage this manually using the underlying `remember()` and `restore()` methods in Inertia.
:::tabs key:frameworks
\== Vue
```js
import { router } from '@inertiajs/vue3'
// Save local component state to history state...
router.remember(data, 'my-key')
// Restore local component state from history state...
let data = router.restore('my-key')
```
\== React
```js
import { router } from '@inertiajs/react'
// Save local component state to history state...
router.remember(data, 'my-key')
// Restore local component state from history state...
let data = router.restore('my-key')
```
\== Svelte 4|Svelte 5
```js
import { router } from '@inertiajs/svelte'
// Save local component state to history state...
router.remember(data, 'my-key')
// Restore local component state from history state...
let data = router.restore('my-key')
```
:::
---
---
url: /guide/responses.md
---
# Responses
## Creating responses
Creating an Inertia response is simple. To get started, just use the `inertia` renderer in your controller methods, providing both the name of the [JavaScript page component](/guide/pages.md) that you wish to render, as well as any props (data) for the page.
```ruby
class EventsController < ApplicationController
def show
event = Event.find(params[:id])
render inertia: 'Event/Show', props: {
event: event.as_json(
only: [:id, :title, :start_date, :description]
)
}
end
end
```
Within Rails applications, the `Event/Show` page would typically correspond to the file located at `app/frontend/pages/Event/Show.(jsx|vue|svelte)`.
> \[!WARNING]
> To ensure that pages load quickly, only return the minimum data required for the page. Also, be aware that **all data returned from the controllers will be visible client-side**, so be sure to omit sensitive information.
### Using instance variables as props
Inertia enables the automatic passing of instance variables as props. This can be achieved by invoking the `use_inertia_instance_props` function in a controller or in a base controller from which other controllers inherit.
```ruby
class EventsController < ApplicationController
use_inertia_instance_props
def index
@events = Event.all
render inertia: 'Events/Index'
end
end
```
This action automatically passes the `@events` instance variable as the `events` prop to the `Events/Index` page component.
> \[!NOTE]
> Manually providing any props for a response disables the instance props feature for that specific response.
> \[!NOTE]
> Instance props are only included if they are defined **after** the `use_inertia_instance_props` call, hence the order of `before_action` callbacks is crucial.
### Automatically determine component name
Rails conventions can be used to automatically render the correct page component by invoking `render inertia: true`:
```ruby
class EventsController < ApplicationController
use_inertia_instance_props
def index
@events = Event.all
render inertia: true
end
end
```
This renders the `app/frontend/pages/events/index.(jsx|vue|svelte)` page component and passes the `@events` instance variable as the `events` prop.
Setting the `default_render` configuration value to `true` establishes this as the default behavior:
```ruby
InertiaRails.configure do |config|
config.default_render = true
end
```
```ruby
class EventsController < ApplicationController
use_inertia_instance_props
def index
@events = Event.all
end
end
```
With this configuration, the `app/frontend/pages/events/index.(jsx|vue|svelte)` page component is rendered automatically, passing the `@events` instance variable as the `events` prop.
If the default component path doesn't match your convention, you can define a custom resolution method via the `component_path_resolver` config value. The value should be callable and will receive the path and action parameters, returning a string component path.
```ruby
inertia_config(
component_path_resolver: ->(path:, action:) do
"Storefront/#{path.camelize}/#{action.camelize}"
end
)
```
## Root template data
There are situations where you may want to access your prop data in your ERB template. For example, you may want to add a meta description tag, Twitter card meta tags, or Facebook Open Graph meta tags. You can access this data via the `page` method.
```erb
# app/views/inertia.html.erb
<% content_for(:head) do %>
">
<% end %>
```
Sometimes you may even want to provide data to the root template that will not be sent to your JavaScript page / component. This can be accomplished by passing the `view_data` option.
```ruby
def show
event = Event.find(params[:id])
render inertia: 'Event', props: { event: }, view_data: { meta: event.meta }
end
```
You can then access this variable like a regular local variable.
```erb
# app/views/inertia.html.erb
<% content_for(:head) do %>
">
<% end %>
```
## Rails generators
Inertia Rails provides a number of generators to help you get started with Inertia in your Rails application. You can generate controllers or use scaffolds to create a new resource with Inertia responses.
### Scaffold generator
To create a resource with Inertia responses, execute the following command in the terminal:
```bash
bin/rails generate inertia:scaffold ModelName field1:type field2:type
```
Example output:
```bash
$ bin/rails generate inertia:scaffold Post title:string body:text
invoke active_record
create db/migrate/20240611123952_create_posts.rb
create app/models/post.rb
invoke test_unit
create test/models/post_test.rb
create test/fixtures/posts.yml
invoke resource_route
route resources :posts
invoke scaffold_controller
create app/controllers/posts_controller.rb
invoke inertia_templates
create app/frontend/pages/Post
create app/frontend/pages/Post/Index.svelte
create app/frontend/pages/Post/Edit.svelte
create app/frontend/pages/Post/Show.svelte
create app/frontend/pages/Post/New.svelte
create app/frontend/pages/Post/Form.svelte
create app/frontend/pages/Post/Post.svelte
invoke resource_route
invoke test_unit
create test/controllers/posts_controller_test.rb
create test/system/posts_test.rb
invoke helper
create app/helpers/posts_helper.rb
invoke test_unit
```
#### Tailwind CSS integration
Inertia Rails tries to detect the presence of Tailwind CSS in the application and generate the templates accordingly. If you want to specify templates type, use the `--inertia-templates` option:
* `inertia_templates` - default
* `inertia_tw_templates` - Tailwind CSS
### Controller generator
To create a controller with an Inertia response, execute the following command in the terminal:
```bash
bin/rails generate inertia:controller ControllerName action1 action2
```
Example output:
```bash
$ bin/rails generate inertia:controller pages welcome next_steps
create app/controllers/pages_controller.rb
route get 'pages/welcome'
get 'pages/next_steps'
invoke test_unit
create test/controllers/pages_controller_test.rb
invoke helper
create app/helpers/pages_helper.rb
invoke test_unit
invoke inertia_templates
create app/frontend/pages/Pages
create app/frontend/pages/Pages/Welcome.jsx
create app/frontend/pages/Pages/NextSteps.jsx
```
### Customizing the generator templates
Rails generators allow templates customization. For example, to customize the controller generator view template, create a file `lib/templates/inertia_templates/controller/react/view.jsx.tt`:
```jsx
export default function <%= @action.camelize %>() {
return (
Hello from my new default template
);
}
```
You can find the default templates in the gem's source code:
* [Default controller generator templates](https://github.com/inertiajs/inertia-rails/tree/master/lib/generators/inertia_templates/controller/templates)
* [Default scaffold generator templates](https://github.com/inertiajs/inertia-rails/tree/master/lib/generators/inertia_templates/scaffold/templates)
* [Tailwind controller generator templates](https://github.com/inertiajs/inertia-rails/tree/master/lib/generators/inertia_tw_templates/controller/templates)
* [Tailwind scaffold generator templates](https://github.com/inertiajs/inertia-rails/tree/master/lib/generators/inertia_tw_templates/scaffold/templates)
> \[!TIP]
> You can also replace the whole generator with your own implementation. See the [Rails documentation](https://guides.rubyonrails.org/generators.html#overriding-rails-generators) for more information.
## Maximum response size
To enable client-side history navigation, all Inertia server responses are stored in the browser's history state. However, keep in mind that some browsers impose a size limit on how much data can be saved within the history state.
For example, [Firefox](https://developer.mozilla.org/en-US/docs/Web/API/History/pushState) has a size limit of 16 MiB and throws a `NS_ERROR_ILLEGAL_VALUE` error if you exceed this limit. Typically, this is much more data than you'll ever practically need when building applications.
---
---
url: /guide/routing.md
---
# Routing
## Defining routes
When using Inertia, all of your application's routes are defined server-side. This means that you don't need Vue Router or React Router. Instead, you can simply define Rails routes and return Inertia responses from those routes.
## Shorthand routes
If you have a page that doesn't need a corresponding controller method, like an "FAQ" or "about" page, you can route directly to a component via the `inertia` method.
```ruby
inertia 'about' => 'AboutComponent'
```
## Generating URLs
Some server-side frameworks allow you to generate URLs from named routes. However, you will not have access to those helpers client-side. Here are a couple ways to still use named routes with Inertia.
The first option is to generate URLs server-side and include them as props. Notice in this example how we're passing the `edit_url` and `create_url` to the `Users/Index` component.
```ruby
class UsersController < ApplicationController
def index
render inertia: 'Users/Index', props: {
users: User.all.map do |user|
user.as_json(
only: [ :id, :name, :email ]
).merge(
edit_url: edit_user_path(user)
)
end,
create_url: new_user_path
}
end
end
```
Another option is to use [JsRoutes](https://github.com/railsware/js-routes) or [JS From Routes](https://js-from-routes.netlify.app) gems that make named server-side routes available on the client via autogenerated helpers.
---
---
url: /guide/scroll-management.md
---
# Scroll management
## Scroll resetting
When navigating between pages, Inertia mimics default browser behavior by automatically resetting the scroll position of the document body (as well as any [scroll regions](#scroll-regions) you've defined) back to the top.
In addition, Inertia keeps track of the scroll position of each page and automatically restores that scroll position as you navigate forward and back in history.
## Scroll preservation
Sometimes it's desirable to prevent the default scroll resetting when making visits. You can disable this behaviour by setting the `preserveScroll` option to `false`.
:::tabs key:frameworks
\== Vue
```js
import { router } from '@inertiajs/vue3'
router.visit(url, { preserveScroll: false })
```
\== React
```js
import { router } from '@inertiajs/react'
router.visit(url, { preserveScroll: false })
```
\== Svelte 4|Svelte 5
```js
import { router } from '@inertiajs/svelte'
router.visit(url, { preserveScroll: false })
```
:::
If you'd like to only preserve the scroll position if the response includes validation errors, set the `preserveScroll` option to `"errors"`.
:::tabs key:frameworks
\== Vue
```js
import { router } from '@inertiajs/vue3'
router.visit(url, { preserveScroll: 'errors' })
```
\== React
```js
import { router } from '@inertiajs/react'
router.visit(url, { preserveScroll: 'errors' })
```
\== Svelte 4|Svelte 5
```js
import { router } from '@inertiajs/svelte'
router.visit(url, { preserveScroll: 'errors' })
```
:::
You can also lazily evaluate the `preserveScroll` option based on the response by providing a callback.
:::tabs key:frameworks
\== Vue
```js
import { router } from '@inertiajs/vue3'
router.post('/users', data, {
preserveScroll: (page) => page.props.someProp === 'value',
})
```
\== React
```js
import { router } from '@inertiajs/react'
router.post('/users', data, {
preserveScroll: (page) => page.props.someProp === 'value',
})
```
\== Svelte 4|Svelte 5
```js
import { router } from '@inertiajs/svelte'
router.post('/users', data, {
preserveScroll: (page) => page.props.someProp === 'value',
})
```
:::
When using an [Inertia link](/guide/links), you can preserve the scroll position using the `preserveScroll` prop.
:::tabs key:frameworks
\== Vue
```vue
Home
```
\== React
```jsx
import { Link } from '@inertiajs/react'
export default () => (
Home
)
```
\== Svelte 4|Svelte 5
```svelte
Home
Home
```
:::
## Scroll regions
If your app doesn't use document body scrolling, but instead has scrollable elements (using the `overflow` CSS property), scroll resetting will not work.
In these situations, you must tell Inertia which scrollable elements to manage by adding the `scroll-region` attribute to the element.
```html
```
---
---
url: /cookbook/server-managed-meta-tags.md
---
# Server Managed Meta Tags
Inertia Rails can manage a page's meta tags on the server instead of on the frontend. This means that link previews (such as on Facebook, LinkedIn, etc.) will include correct meta *without server-side rendering*.
Inertia Rails renders server defined meta tags into both the server rendered HTML and the client-side Inertia page props. Because the tags share unique `head-key` attributes, the client will "take over" the meta tags after the initial page load.
## Setup
### Server Side
Simply add the `inertia_meta_tags` helper to your layout. This will render the meta tags in the `` section of your HTML.
```erb
...
<%= inertia_meta_tags %>
```
> \[!NOTE]
> If you have a `` tag in your Rails layout, make sure it has the `inertia` attribute on it so Inertia knows it should deduplicate it. The Inertia Rails install generator does this for you automatically.
### Client Side
Copy the following code into your application. It should be rendered **once** in your application, such as in a [layout component
](/guide/pages#creating-layouts).
:::tabs key:frameworks
\== Vue
```vue
<script>
import { Head } from '@inertiajs/vue3'
import { usePage } from '@inertiajs/vue3'
import { h } from 'vue'
export default {
name: 'MetaTags',
setup() {
const page = usePage()
return () => {
const metaTags = page.props._inertia_meta || []
return h(Head, {}, () =>
metaTags.map((meta) => {
const { tagName, innerContent, headKey, httpEquiv, ...attrs } = meta
const attributes = {
key: headKey,
'head-key': headKey,
...attrs,
}
if (httpEquiv) {
attributes['http-equiv'] = httpEquiv
}
let content = null
if (innerContent != null) {
content =
typeof innerContent === 'string'
? innerContent
: JSON.stringify(innerContent)
}
return h(tagName, attributes, content)
}),
)
}
},
}
</script>
```
\== React
```jsx
import React from 'react'
import { Head, usePage } from '@inertiajs/react'
const MetaTags = () => {
const { _inertia_meta: meta } = usePage().props
return (
<Head>
{meta.map((meta) => {
const { tagName, innerContent, headKey, httpEquiv, ...attrs } = meta
let stringifiedInnerContent
if (innerContent != null) {
stringifiedInnerContent =
typeof innerContent === 'string'
? innerContent
: JSON.stringify(innerContent)
}
return React.createElement(tagName, {
key: headKey,
'head-key': headKey,
...(httpEquiv ? { 'http-equiv': httpEquiv } : {}),
...attrs,
...(stringifiedInnerContent
? { dangerouslySetInnerHTML: { __html: stringifiedInnerContent } }
: {}),
})
})}
</Head>
)
}
export default MetaTags
```
\== Svelte 4|Svelte 5
```svelte
<!-- MetaTags.svelte -->
<script>
import { onMount } from 'svelte'
import { page } from '@inertiajs/svelte'
$: metaTags = ($page.props._inertia_meta ?? []).map(
({ tagName, headKey, innerContent, httpEquiv, ...attrs }) => ({
tagName,
headKey,
innerContent,
attrs: httpEquiv ? { ...attrs, 'http-equiv': httpEquiv } : attrs,
}),
)
// Svelte throws warnings if we render void elements like meta with content
$: voidTags = metaTags.filter((tag) => tag.innerContent == null)
$: contentTags = metaTags.filter((tag) => tag.innerContent != null)
let ready = false
onMount(() => {
// Clean up server-rendered tags
document.head.querySelectorAll('[inertia]').forEach((el) => el.remove())
ready = true
})
</script>
<svelte:head>
{#if ready}
<!-- Void elements (no content) -->
{#each voidTags as tag (tag.headKey)}
<svelte:element this={tag.tagName} inertia={tag.headKey} {...tag.attrs} />
{/each}
<!-- Elements with content -->
{#each contentTags as tag (tag.headKey)}
<svelte:element this={tag.tagName} inertia={tag.headKey} {...tag.attrs}>
{@html typeof tag.innerContent === 'string'
? tag.innerContent
: JSON.stringify(tag.innerContent)}
</svelte:element>
{/each}
{/if}
</svelte:head>
```
:::
## Rendering Meta Tags
Tags are defined as plain hashes and conform to the following structure:
```ruby
# All fields are optional.
{
# Defaults to "meta" if not provided
tag_name: "meta",
# Used for <meta http-equiv="...">
http_equiv: "Content-Security-Policy",
# Used to deduplicate tags. InertiaRails will auto-generate one if not provided
head_key: "csp-header",
# Used with <script>, <title>, etc.
inner_content: "Some content",
# Any additional attributes will be passed directly to the tag.
# For example: name: "description", content: "Page description"
name: "description",
content: "A description of the page"
}
```
The `<title>` tag has shortcut syntax:
```ruby
{ title: "The page title" }
```
### In the renderer
Add meta tags to an action by passing an array of hashes to the `meta:` option in the `render` method:
```ruby
class EventsController < ApplicationController
def show
event = Event.find(params[:id])
render inertia: 'Event/Show', props: { event: event.as_json }, meta: [
{ title: "Check out the #{event.name} event!" },
{ name: 'description', content: event.description },
{ tag_name: 'script', type: 'application/ld+json', inner_content: { '@context': 'https://schema.org', '@type': 'Event', name: 'My Event' } }
]
end
end
```
### Shared Meta Tags
Often, you will want to define default meta tags that are shared across certain pages and which you can override within a specific controller or action. Inertia Rails has an `inertia_meta` controller instance method which references a store of meta tag data.
You can call it anywhere in a controller to manage common meta tags, such as in `before_action` callbacks or directly in an action.
```ruby
class EventsController < ApplicationController
before_action :set_meta_tags
def show
render inertia: 'Event/Show', props: { event: Event.find(params[:id]) }
end
private
def set_meta_tags
inertia_meta.add([
{ title: 'Look at this event!' }
])
end
end
```
#### The `inertia_meta` API
The `inertia_meta` method provides a simple API to manage your meta tags. You can add, remove, or clear tags as needed. The `inertia_meta.remove` method accepts either a `head_key` string or a block to filter tags.
```ruby
# Add a single tag
inertia_meta.add({ title: 'Some Page title' })
# Add multiple tags at once
inertia_meta.add([
{ tag_name: 'meta', name: 'og:description', content: 'A description of the page' },
{ tag_name: 'meta', name: 'twitter:title', content: 'A title for Twitter' },
{ tag_name: 'title', inner_content: 'A title for the page', head_key: 'my_custom_head_key' },
{ tag_name: 'script', type: 'application/ld+json', inner_content: { '@context': 'https://schema.org', '@type': 'Event', name: 'My Event' } }
])
# Remove a specific tag by head_key
inertia_meta.remove("my_custom_head_key")
# Remove tags by a condition
inertia_meta.remove do |tag|
tag[:tag_name] == 'script' && tag[:type] == 'application/ld+json'
end
# Remove all tags
inertia_meta.clear
```
#### JSON-LD and Script Tags
Inertia Rails supports defining `<script>` tags with `type="application/ld+json"` for structured data. All other script tags will be marked as `type="text/plain"` to prevent them from executing on the client side. Executable scripts should be added either in the Rails layout or using standard techniques in your frontend framework.
```ruby
inertia_meta.add({
tag_name: "script",
type: "application/ld+json",
inner_content: {
"@context": "https://schema.org",
"@type": "Event",
name: "My Event",
startDate: "2023-10-01T10:00:00Z",
location: {
"@type": "Place",
name: "Event Venue",
address: "123 Main St, City, Country"
}
}
})
```
## Deduplication
> \[!NOTE]
> The Svelte adapter does not have a `<Head />` component. Inertia Rails will deduplicate meta tags *on the server*, and the Svelte component above will render them deduplicated accordingly.
### Automatic Head Keys
Inertia Rails relies on the `head-key` attribute and the `<Head />` components that the Inertia.js core uses to [manage meta tags](/guide/title-and-meta) and deduplicate them. Inertia.js core expects us to manage `head-key` attributes and deduplication manually, but Inertia Rails will generate them automatically for you.
* `<meta>` tags will use the `name`,`property`, or `http_equiv` attributes to generate a head key. This enables automatic deduplication of common meta tags like `description`, `og:title`, and `twitter:card`.
* All other tags will deterministically generate a `head-key` based on the tag's attributes.
#### Allowing Duplicates
Sometimes, it is valid HTML to have multiple meta tags with the same name or property. If you want to allow duplicates, you can set the `allow_duplicates` option to `true` when defining the tag.
```ruby
class StoriesController < ApplicationController
before_action do
inertia_meta.add({ name: 'article:author', content: 'Tony Gilroy' })
end
# Renders a single article:author meta tag
def single_author
render inertia: 'Stories/Show'
end
# Renders multiple article:author meta tags
def multiple_authors
render inertia: 'Stories/Show', meta: [
{ name: 'article:author', content: 'Dan Gilroy', allow_duplicates: true },
]
end
end
```
### Manual Head Keys
Automatic head keys should cover the majority of use cases, but you can set `head_key` manually if you need to control the deduplication behavior more precisely. For example, you may want to do this if you know you will remove a shared meta tag in a specific action.
```ruby
# In a concern or `before_action` callback
inertia_meta.add([
{
tag_name: 'meta',
name: 'description',
content: 'A description of the page',
head_key: 'my_custom_head_key'
},
])
# Later in a specific action
inertia_meta.remove('my_custom_head_key')
```
## Combining Meta Tag Methods
There are multiple ways to manage meta tags in Inertia Rails:
* Adding tags to a Rails layout such as `application.html.erb`.
* Using the `<Head />` component from Inertia.js (or the Svelte head element) in the frontend.
* Using the server driven meta tags feature described here.
Nothing prevents you from using these together, but for organizational purposes, we recommended using only one of the last two techniques.
---
---
url: /guide/server-side-rendering.md
---
# Server-side Rendering (SSR)
Server-side rendering pre-renders your JavaScript pages on the server, allowing your visitors to receive fully rendered HTML when they visit your application. Since fully rendered HTML is served by your application, it's also easier for search engines to index your site.
> \[!NOTE]
> Server-side rendering uses Node.js to render your pages in a background process; therefore, Node must be available on your server for server-side rendering to function properly.
## Install dependencies
First, install the additional dependencies required for server-side rendering. This is only necessary for the Vue adapters, so you can skip this step if you're using React or Svelte.
:::tabs key:frameworks
\== Vue
```shell
npm install @vue/server-renderer
```
\== React
```shell
// No additional dependencies required
```
\== Svelte 4|Svelte 5
```shell
// No additional dependencies required
```
:::
## Add server entry-point
Next, we'll create a `app/frontend/ssr/ssr.js` file within the Rails project that will serve as the SSR entry point.
This file is going to look very similar to your regular inertia initialization file, except it's not going to run in the browser, but rather in Node.js. Here's a complete example.
:::tabs key:frameworks
\== Vue
```js
import { createInertiaApp } from '@inertiajs/vue3'
import createServer from '@inertiajs/vue3/server'
import { renderToString } from '@vue/server-renderer'
import { createSSRApp, h } from 'vue'
createServer((page) =>
createInertiaApp({
page,
render: renderToString,
resolve: (name) => {
const pages = import.meta.glob('../pages/**/*.vue', { eager: true })
return pages[`../pages/${name}.vue`]
},
setup({ App, props, plugin }) {
return createSSRApp({
render: () => h(App, props),
}).use(plugin)
},
}),
)
```
\== React
```js
import { createInertiaApp } from '@inertiajs/react'
import createServer from '@inertiajs/react/server'
import ReactDOMServer from 'react-dom/server'
createServer((page) =>
createInertiaApp({
page,
render: ReactDOMServer.renderToString,
resolve: (name) => {
const pages = import.meta.glob('../pages/**/*.jsx', { eager: true })
return pages[`../pages/${name}.jsx`]
},
setup: ({ App, props }) => <App {...props} />,
}),
)
```
\== Svelte 4
```js
import { createInertiaApp } from '@inertiajs/svelte'
import createServer from '@inertiajs/svelte/server'
createServer((page) =>
createInertiaApp({
page,
resolve: (name) => {
const pages = import.meta.glob('../pages/**/*.svelte', { eager: true })
return pages[`../pages/${name}.svelte`]
},
setup({ App, props }) {
return App.render(props)
},
}),
)
```
\== Svelte 5
```js
import { createInertiaApp } from '@inertiajs/svelte'
import createServer from '@inertiajs/svelte/server'
import { render } from 'svelte/server'
createServer((page) =>
createInertiaApp({
page,
resolve: (name) => {
const pages = import.meta.glob('../pages/**/*.svelte', { eager: true })
return pages[`../pages/${name}.svelte`]
},
setup({ App, props }) {
return render(App, { props })
},
}),
)
```
:::
When creating this file, be sure to add anything that's missing from your regular initialization file that makes sense to run in SSR mode, such as plugins or custom mixins.
## Clustering
> Requires `@inertiajs/core` v2.0.7 or higher.
By default, the SSR server will run on a single thread. Clustering starts multiple Node servers on the same port, requests are then handled by each thread in a round-robin way.
You can enable clustering by passing a second argument to `createServer`:
:::tabs key:frameworks
\== Vue
```js
import { createInertiaApp } from '@inertiajs/vue3'
import createServer from '@inertiajs/vue3/server'
import { renderToString } from '@vue/server-renderer'
import { createSSRApp, h } from 'vue'
createServer(
(page) =>
createInertiaApp({
// ...
}),
{ cluster: true },
)
```
\== React
```js
import { createInertiaApp } from '@inertiajs/react'
import createServer from '@inertiajs/react/server'
import ReactDOMServer from 'react-dom/server'
createServer(
(page) =>
createInertiaApp({
// ...
}),
{ cluster: true },
)
```
\== Svelte 4
```js
import { createInertiaApp } from '@inertiajs/svelte'
import createServer from '@inertiajs/svelte/server'
createServer(
(page) =>
createInertiaApp({
// ...
}),
{ cluster: true },
)
```
\== Svelte 5
```js
import { createInertiaApp } from '@inertiajs/svelte'
import createServer from '@inertiajs/svelte/server'
import { render } from 'svelte/server'
createServer(
(page) =>
createInertiaApp({
// ...
}),
{ cluster: true },
)
```
:::
## Setup Vite Ruby
Next, we need to update our Vite configuration to build our new `ssr.js` file. We can do this by adding a `ssrBuildEnabled` property to Ruby Vite plugin configuration in the `config/vite.json` file.
```json
"production": {
"ssrBuildEnabled": true // [!code ++]
}
```
> \[!NOTE]
> For more available properties see the [Ruby Vite documentation](https://vite-ruby.netlify.app/config/#ssr-options-experimental).
## Enable SSR in the Inertia's Rails adapter
```ruby
InertiaRails.configure do |config|
config.ssr_enabled = ViteRuby.config.ssr_build_enabled
end
```
Now you can build your server-side bundle.
```shell
bin/vite build --ssr
```
## Running the SSR server
Now that you have built both your client-side and server-side bundles, you should be able run the Node-based Inertia SSR server using the following command.
```shell
bin/vite ssr
```
With the server running, you should be able to access your app within the browser with server-side rendering enabled. In fact, you should be able to disable JavaScript entirely and still navigate around your application.
## Client side hydration
Since your website is now being server-side rendered, you can instruct your client to "hydrate" the static markup and make it interactive instead of re-rendering all the HTML that we just generated.
To enable client-side hydration, update your initialization file:
:::tabs key:frameworks
\== Vue
```js
// frontend/entrypoints/inertia.js
import { createApp, h } from 'vue' // [!code --]
import { createSSRApp, h } from 'vue' // [!code ++]
import { createInertiaApp } from '@inertiajs/vue3'
createInertiaApp({
resolve: (name) => {
const pages = import.meta.glob('../pages/**/*.vue', { eager: true })
return pages[`../pages/${name}.vue`]
},
setup({ el, App, props, plugin }) {
createApp({ render: () => h(App, props) }) // [!code --]
createSSRApp({ render: () => h(App, props) }) // [!code ++]
.use(plugin)
.mount(el)
},
})
```
\== React
```js
// frontend/entrypoints/inertia.js
import { createInertiaApp } from '@inertiajs/react'
import { createRoot } from 'react-dom/client' // [!code --]
import { hydrateRoot } from 'react-dom/client' // [!code ++]
createInertiaApp({
resolve: (name) => {
const pages = import.meta.glob('../pages/**/*.jsx', { eager: true })
return pages[`../pages/${name}.jsx`]
},
setup({ el, App, props }) {
createRoot(el).render(<App {...props} />) // [!code --]
hydrateRoot(el, <App {...props} />) // [!code ++]
},
})
```
\== Svelte 4
```js
// frontend/entrypoints/inertia.js
import { createInertiaApp } from '@inertiajs/svelte'
createInertiaApp({
resolve: (name) => {
const pages = import.meta.glob('../pages/**/*.svelte', { eager: true })
return pages[`../pages/${name}.svelte`]
},
setup({ el, App, props }) {
new App({ target: el, props }) // [!code --]
new App({ target: el, props, hydrate: true }) // [!code ++]
},
})
```
You will also need to set the `hydratable` compiler option to `true` in your `vite.config.js` file:
```js
// vite.config.js
import { svelte } from '@sveltejs/vite-plugin-svelte'
import laravel from 'laravel-vite-plugin'
import { defineConfig } from 'vite'
export default defineConfig({
plugins: [
laravel.default({
input: ['resources/css/app.css', 'resources/js/app.js'],
ssr: 'resources/js/ssr.js',
refresh: true,
}),
svelte(), // [!code --]
svelte({ // [!code ++]
// [!code ++]
compilerOptions: { // [!code ++]
// [!code ++]
hydratable: true, // [!code ++]
}, // [!code ++]
}), // [!code ++]
],
})
```
\== Svelte 5
```js
// frontend/entrypoints/inertia.js
import { createInertiaApp } from '@inertiajs/svelte'
import { mount } from 'svelte' // [!code --]
import { hydrate, mount } from 'svelte' // [!code ++]
createInertiaApp({
resolve: (name) => {
const pages = import.meta.glob('./Pages/**/*.svelte', { eager: true })
return pages[`./Pages/${name}.svelte`]
},
setup({ el, App, props }) {
mount(App, { target: el, props }) // [!code --]
if (el.dataset.serverRendered === 'true') { // [!code ++]
hydrate(App, { target: el, props }) // [!code ++]
} else { // [!code ++]
mount(App, { target: el, props }) // [!code ++]
} // [!code ++]
},
})
```
:::
## Deployment
When deploying your SSR enabled app to production, you'll need to build both the client-side (`application.js`) and server-side bundles (`ssr.js`), and then run the SSR server as a background process.
---
---
url: /guide/server-side-setup.md
---
# Server-side setup
The first step when installing Inertia is to configure your server-side framework. Inertia maintains official server-side adapters for [Laravel](https://laravel.com) and [Ruby on Rails](https://rubyonrails.org). For other frameworks, please see the [community adapters](https://inertiajs.com/community-adapters).
> \[!NOTE]
> For the official Laravel adapter instructions, please see the [official documentation](https://inertiajs.com/server-side-setup).
## Install dependencies
First, install the Inertia server-side adapter gem and add to the application's Gemfile by executing:
```bash
bundle add inertia_rails
```
## Rails generator
If you plan to use Vite as your frontend build tool, you can use the built-in generator to install and set up Inertia in a Rails application. It automatically detects if the [Vite Rails](https://vite-ruby.netlify.app/guide/rails.html) gem is installed and will attempt to install it if not present.
To install and setup Inertia in a Rails application, execute the following command in the terminal:
```bash
bin/rails generate inertia:install
```
This command will:
* Check for Vite Rails and install it if not present
* Ask if you want to use TypeScript
* Ask you to choose your preferred frontend framework (React, Vue, Svelte 4, or Svelte 5)
* Ask if you want to install Tailwind CSS
* Install necessary dependencies
* Set up the application to work with Inertia
* Copy example Inertia controller and views (can be skipped with the `--skip-example` option)
> \[!NOTE]
> To use TypeScript with Svelte, you need to install `@inertiajs/svelte` version `1.3.0-beta.2` or higher. You can use the `--inertia-version` option to specify the version.
Example output:
```bash
$ bin/rails generate inertia:install
Installing Inertia's Rails adapter
Could not find a package.json file to install Inertia to.
Would you like to install Vite Ruby? (y/n) y
run bundle add vite_rails from "."
Vite Rails gem successfully installed
run bundle exec vite install from "."
Vite Rails successfully installed
Would you like to use TypeScript? (y/n) y
Adding TypeScript support
What framework do you want to use with Inertia? [react, vue, svelte4, svelte] (react)
run npm add @types/react @types/react-dom typescript --silent from "."
Would you like to install Tailwind CSS? (y/n) y
Installing Tailwind CSS
run npm add tailwindcss postcss autoprefixer @tailwindcss/forms @tailwindcss/typography @tailwindcss/container-queries --silent from "."
create tailwind.config.js
create postcss.config.js
create app/frontend/entrypoints/application.css
Adding Tailwind CSS to the application layout
insert app/views/layouts/application.html.erb
Adding Inertia's Rails adapter initializer
create config/initializers/inertia_rails.rb
Installing Inertia npm packages
run npm add @vitejs/plugin-react react react-dom --silent from "."
run npm add @inertiajs/react@latest --silent from "."
Adding Vite plugin for react
insert vite.config.ts
prepend vite.config.ts
Copying inertia.ts entrypoint
create app/frontend/entrypoints/inertia.ts
Adding inertia.ts script tag to the application layout
insert app/views/layouts/application.html.erb
Adding Vite React Refresh tag to the application layout
insert app/views/layouts/application.html.erb
gsub app/views/layouts/application.html.erb
Copying example Inertia controller
create app/controllers/inertia_example_controller.rb
Adding a route for the example Inertia controller
route get 'inertia-example', to: 'inertia_example#index'
Copying page assets
create app/frontend/pages/InertiaExample.module.css
create app/frontend/assets/react.svg
create app/frontend/assets/inertia.svg
create app/frontend/assets/vite_ruby.svg
create app/frontend/pages/InertiaExample.tsx
create tsconfig.json
create tsconfig.app.json
create tsconfig.node.json
create app/frontend/vite-env.d.ts
Copying bin/dev
create bin/dev
Inertia's Rails adapter successfully installed
```
With that done, you can now start the Rails server and the Vite development server (we recommend using [Overmind](https://github.com/DarthSim/overmind)):
```bash
bin/dev
```
And navigate to `http://localhost:3100/inertia-example` to see the example Inertia page.
That's it! You're all set up to start using Inertia in your Rails application. Check the guide on [creating pages](/guide/pages) to know more.
## Root template
If you decide not to use the generator, you can manually set up Inertia in your Rails application.
First, setup the root template that will be loaded on the first page visit. This will be used to load your site assets (CSS and JavaScript), and will also contain a root `<div>` to boot your JavaScript application in.
:::tabs key:builders
\== Vite
```erb
<!DOCTYPE html>
<html>
<head>
<meta name="viewport" content="width=device-width,initial-scale=1">
<%= csp_meta_tag %>
<%= inertia_ssr_head %>
<%# If you want to use React add `vite_react_refresh_tag` %>
<%= vite_client_tag %>
<%= vite_javascript_tag 'application' %>
</head>
<body>
<%= yield %>
</body>
</html>
```
\== Webpacker/Shakapacker
```erb
<!DOCTYPE html>
<html>
<head>
<meta name="viewport" content="width=device-width,initial-scale=1">
<%= csp_meta_tag %>
<%= inertia_ssr_head %>
<%= stylesheet_pack_tag 'application' %>
<%= javascript_pack_tag 'application', defer: true %>
</head>
<body>
<%= yield %>
</body>
</html>
```
:::
This template should include your assets, as well as the `yield` method to render the Inertia page. The `inertia_ssr_head` method is used to include the Inertia headers in the response, it's required when [SSR](/guide/server-side-rendering.md) is enabled.
Inertia's adapter will use standard Rails layout inheritance, with `view/layouts/application.html.erb` as a default layout. If you would like to use a different default layout, you can change it using the `InertiaRails.configure`.
```ruby
# config/initializers/inertia_rails.rb
InertiaRails.configure do |config|
config.layout = 'my_inertia_layout'
end
```
# Creating responses
That's it, you're all ready to go server-side! Once you setup the [client-side](/guide/client-side-setup.md) framework, you can start start creating Inertia [pages](/guide/pages.md) and rendering them via [responses](/guide/responses.md).
```ruby
class EventsController < ApplicationController
def show
event = Event.find(params[:id])
render inertia: 'Event/Show', props: {
event: event.as_json(
only: [:id, :title, :start_date, :description]
)
}
end
end
```
---
---
url: /guide/shared-data.md
---
# Shared data
Sometimes you need to access specific pieces of data on numerous pages within your application. For example, you may need to display the current user in the site header. Passing this data manually in each response across your entire application is cumbersome. Thankfully, there is a better option: shared data.
## Sharing data
The `inertia_share` method allows you to define data that will be available to all controller actions, automatically merging with page-specific props.
### Basic Usage
```ruby
class EventsController < ApplicationController
# Static sharing: Data is evaluated immediately
inertia_share app_name: Rails.configuration.app_name
# Dynamic sharing: Data is evaluated at render time
inertia_share do
{
user: current_user,
notifications: current_user&.unread_notifications_count
} if user_signed_in?
end
# Alternative syntax for single dynamic values
inertia_share total_users: -> { User.count }
end
```
### Conditional Sharing
You can control when data is shared using Rails-style controller filters. The `inertia_share` method supports these filter options:
* `only`: Share data for specific actions
* `except`: Share data for all actions except specified ones
* `if`: Share data when condition is true
* `unless`: Share data when condition is false
```ruby
class EventsController < ApplicationController
# Share user data only when authenticated
inertia_share if: :user_signed_in? do
{
user: {
name: current_user.name,
email: current_user.email,
role: current_user.role
}
}
end
# Share data only for specific actions
inertia_share only: [:index, :show] do
{
meta: {
last_updated: Time.current,
version: "1.0"
}
}
end
end
```
> \[!NOTE]
> Shared data should be used sparingly as all shared data is included with every response.
> \[!NOTE]
> Page props and shared data are merged together, so be sure to namespace your shared data appropriately to avoid collisions.
## Accessing shared data
Once you have shared the data server-side, you will be able to access it within any of your pages or components. Here's an example of how to access shared data in a layout component.
:::tabs key:frameworks
\== Vue
```vue
<script setup>
import { computed } from 'vue'
import { usePage } from '@inertiajs/vue3'
const page = usePage()
const user = computed(() => page.props.auth.user)
</script>
<template>
<main>
<header>You are logged in as: {{ user.name }}</header>
<article>
<slot />
</article>
</main>
</template>
```
\== React
```jsx
import { usePage } from '@inertiajs/react'
export default function Layout({ children }) {
const { auth } = usePage().props
return (
<main>
<header>You are logged in as: {auth.user.name}</header>
<article>{children}</article>
</main>
)
}
```
\== Svelte 4|Svelte 5
```svelte
<script>
import { page } from '@inertiajs/svelte'
</script>
<main>
<header>
You are logged in as: {$page.props.auth.user.name}
</header>
<article>
<slot />
</article>
</main>
```
:::
# Flash messages
Another great use-case for shared data is flash messages. These are messages stored in the session only for the next request. For example, it's common to set a flash message after completing a task and before redirecting to a different page.
Here's a simple way to implement flash messages in your Inertia applications. First, share the flash message on each request.
```ruby
class ApplicationController < ActionController::Base
inertia_share flash: -> { flash.to_hash }
end
```
Next, display the flash message in a frontend component, such as the site layout.
:::tabs key:frameworks
\== Vue
```vue
<template>
<main>
<header></header>
<article>
<div v-if="$page.props.flash.alert" class="alert">
{{ $page.props.flash.alert }}
</div>
<div v-if="$page.props.flash.notice" class="notice">
{{ $page.props.flash.notice }}
</div>
<slot />
</article>
<footer></footer>
</main>
</template>
```
\== React
```jsx
import { usePage } from '@inertiajs/react'
export default function Layout({ children }) {
const { flash } = usePage().props
return (
<main>
<header></header>
<article>
{flash.alert && <div className="alert">{flash.alert}</div>}
{flash.notice && <div className="notice">{flash.notice}</div>}
{children}
</article>
<footer></footer>
</main>
)
}
```
\== Svelte 4|Svelte 5
```svelte
<script>
import { page } from '@inertiajs/svelte'
</script>
<main>
<header></header>
<article>
{#if $page.props.flash.alert}
<div class="alert">{$page.props.flash.alert}</div>
{/if}
{#if $page.props.flash.notice}
<div class="notice">{$page.props.flash.notice}</div>
{/if}
<slot />
</article>
<footer></footer>
</main>
```
:::
## Deep Merging Shared Data
By default, Inertia will shallow merge data defined in an action with the shared data. You might want a deep merge. Imagine using shared data to represent defaults you'll override sometimes.
```ruby
class ApplicationController
inertia_share do
{ basketball_data: { points: 50, rebounds: 100 } }
end
end
```
Let's say we want a particular action to change only part of that data structure. The renderer accepts a `deep_merge` option:
```ruby
class CrazyScorersController < ApplicationController
def index
render inertia: 'CrazyScorersComponent',
props: { basketball_data: { points: 100 } },
deep_merge: true
end
end
# The renderer will send this to the frontend:
{
basketball_data: {
points: 100,
rebounds: 100,
}
}
```
Deep merging can be set as the project wide default via the `InertiaRails` configuration:
```ruby
# config/initializers/some_initializer.rb
InertiaRails.configure do |config|
config.deep_merge_shared_data = true
end
```
If deep merging is enabled by default, it's possible to opt out within the action:
```ruby
class CrazyScorersController < ApplicationController
inertia_share do
{
basketball_data: {
points: 50,
rebounds: 10,
}
}
end
def index
render inertia: 'CrazyScorersComponent',
props: { basketball_data: { points: 100 } },
deep_merge: false
end
end
# Even if deep merging is set by default, since the renderer has `deep_merge: false`, it will send a shallow merge to the frontend:
{
basketball_data: {
points: 100,
}
}
```
---
---
url: /guide/testing.md
---
# Testing
There are many different ways to test an Inertia.js app. This page provides a quick overview of the tools available.
## End-to-end tests
One popular approach to testing your JavaScript page components, is to use an end-to-end testing tool like [Capybara](https://github.com/teamcapybara/capybara) or [Cypress](https://www.cypress.io). These are browser automation tools that allow you to run real simulations of your app in the browser. These tests are known to be slower, and sometimes brittle, but since they test your application at the same layer as your end users, they can provide a lot of confidence that your app is working correctly. And, since these tests are run in the browser your JavaScript code is actually executed and tested as well.
## Client-side unit tests
Another approach to testing your page components is using a client-side unit testing framework, such as [Vitest](https://vitest.dev), [Jest](https://jestjs.io) or [Mocha](https://mochajs.org). This approach allows you to test your JavaScript page components in isolation using Node.js.
## Endpoint tests
In addition to testing your JavaScript page components, you'll also want to test the Inertia responses that come back from your server-side framework. A popular approach to doing this is using endpoint tests, where you make requests to your application and examine the responses.
If you're using RSpec, Inertia Rails comes with some nice test helpers to make things simple.
To use these helpers, just add the following require statement to your `spec/rails_helper.rb`
```ruby
require 'inertia_rails/rspec'
```
And in any test you want to use the inertia helpers, add the `:inertia` flag to the block.
```ruby
# spec/requests/events_spec.rb
RSpec.describe "/events", inertia: true do
describe '#index' do
# ...
end
end
```
### Assertions
```ruby
# spec/requests/events_spec.rb
RSpec.describe '/events', inertia: true do
describe '#index' do
let!(:event) { Event.create!(title: 'Foo', start_date: '2024-02-21', description: 'Foo bar') }
it "renders inertia component" do
get events_path
# check the component
expect(inertia).to render_component 'Event/Index'
# or
expect_inertia.to render_component 'Event/Index'
# same as above
expect(inertia.component).to eq 'Event/Index'
# props (including shared props)
expect(inertia).to have_exact_props({title: 'Foo', description: 'Foo bar'})
expect(inertia).to include_props({title: 'Foo'})
# access props
expect(inertia.props[:title]).to eq 'Foo'
# view data
expect(inertia).to have_exact_view_data({meta: 'Foo bar'})
expect(inertia).to include_view_data({meta: 'Foo bar'})
# access view data
expect(inertia.view_data[:meta]).to eq 'Foo bar'
end
end
end
```
---
---
url: /guide/the-protocol.md
---
# The protocol
This page contains a detailed specification of the Inertia protocol. Be sure to read the [how it works](/guide/how-it-works.md) page first for a high-level overview.
## HTML responses
The very first request to an Inertia app is just a regular, full-page browser request, with no special Inertia headers or data. For these requests, the server returns a full HTML document.
This HTML response includes the site assets (CSS, JavaScript) as well as a root `<div>` in the page's body. The root `<div>` serves as a mounting point for the client-side app, and includes a `data-page` attribute with a JSON encoded [page object] for the initial page. Inertia uses this information to boot your client-side framework and display the initial page component.
```http
REQUEST
GET: http://example.com/events/80
Accept: text/html, application/xhtml+xml
RESPONSE
HTTP/1.1 200 OK
Content-Type: text/html; charset=utf-8
<html>
<head>
<title>My app
```
> \[!NOTE]
> While the initial response is HTML, Inertia does not server-side render the JavaScript page components by default (see [Server-side Rendering](/guide/server-side-rendering)).
## Inertia responses
Once the Inertia app has been booted, all subsequent requests to the site are made via XHR with a `X-Inertia` header set to `true`. This header indicates that the request is being made by Inertia and isn't a standard full-page visit.
When the server detects the `X-Inertia` header, instead of responding with a full HTML document, it returns a JSON response with an encoded [page object].
```http
REQUEST
GET: http://example.com/events/80
Accept: text/html, application/xhtml+xml
X-Requested-With: XMLHttpRequest
X-Inertia: true
X-Inertia-Version: 6b16b94d7c51cbe5b1fa42aac98241d5
RESPONSE
HTTP/1.1 200 OK
Content-Type: application/json
Vary: X-Inertia
X-Inertia: true
{
"component": "Event",
"props": {
"errors": {},
"event": {
"id": 80,
"title": "Birthday party",
"start_date": "2019-06-02",
"description": "Come out and celebrate Jonathan's 36th birthday party!"
}
},
"url": "/events/80",
"version": "c32b8e4965f418ad16eaebba1d4e960f",
"encryptHistory": true,
"clearHistory": false
}
```
## The page object
Inertia shares data between the server and client via a page object. This object includes the necessary information required to render the page component, update the browser's history state, and track the site's asset version. The page object includes the following four properties:
1. `component`: The name of the JavaScript page component.
2. `props`: The page props. Contains all of the page data along with an `errors` object (defaults to `{}` if there are no errors).
3. `url`: The page URL.
4. `version`: The current asset version.
5. `encryptHistory`: Whether or not to encrypt the current page's history state.
6. `clearHistory`: Whether or not to clear any encrypted history state.
On standard full page visits, the page object is JSON encoded into the `data-page` attribute in the root `
`. On Inertia visits, the page object is returned as the JSON payload.
## Asset versioning
One common challenge with single-page apps is refreshing site assets when they've been changed. Inertia makes this easy by optionally tracking the current version of the site's assets. In the event that an asset changes, Inertia will automatically make a full-page visit instead of an XHR visit.
The Inertia [page object] includes a `version` identifier. This version identifier is set server-side and can be a number, string, file hash, or any other value that represents the current "version" of your site's assets, as long as the value changes when the site's assets have been updated.
Whenever an Inertia request is made, Inertia will include the current asset version in the `X-Inertia-Version` header. When the server receives the request, it compares the asset version provided in the `X-Inertia-Version` header with the current asset version. This is typically handled in the middleware layer of your server-side framework.
If the asset versions are the same, the request simply continues as expected. However, if the asset versions are different, the server immediately returns a `409 Conflict` response, and includes the URL in a `X-Inertia-Location` header. This header is necessary, since server-side redirects may have occurred. This tells Inertia what the final intended destination URL is.
Note, `409 Conflict` responses are only sent for `GET` requests, and not for `POST/PUT/PATCH/DELETE` requests. That said, they will be sent in the event that a `GET` redirect occurs after one of these requests.
If "flash" session data exists when a `409 Conflict` response occurs, Inertia's server-side framework adapters will automatically reflash this data.
```http
REQUEST
GET: http://example.com/events/80
Accept: text/html, application/xhtml+xml
X-Requested-With: XMLHttpRequest
X-Inertia: true
X-Inertia-Version: 6b16b94d7c51cbe5b1fa42aac98241d5
RESPONSE
409: Conflict
X-Inertia-Location: http://example.com/events/80
```
## Partial reloads
When making Inertia requests, the partial reload option allows you to request a subset of the props (data) from the server on subsequent visits to the same page component. This can be a helpful performance optimization if it's acceptable that some page data becomes stale.
When a partial reload request is made, Inertia includes the `X-Inertia-Partial-Component` header and may include `X-Inertia-Partial-Data` and/or `X-Inertia-Partial-Except` headers with the request.
The `X-Inertia-Partial-Data` header is a comma separated list of the desired props (data) keys that should be returned.
The `X-Inertia-Partial-Except` header is a comma separated list of the props (data) keys that should not be returned. When only the `X-Inertia-Partial-Except` header is included, all props (data) except those listed will be sent. If both `X-Inertia-Partial-Data` and `X-Inertia-Partial-Except` headers are included, the `X-Inertia-Partial-Except` header will take precedence.
The `X-Inertia-Partial-Component` header includes the name of the component that is being partially reloaded. This is necessary, since partial reloads only work for requests made to the same page component. If the final destination is different for some reason (e.g. the user was logged out and is now on the login page), then no partial reloading will occur.
```http
REQUEST
GET: http://example.com/events
Accept: text/html, application/xhtml+xml
X-Requested-With: XMLHttpRequest
X-Inertia: true
X-Inertia-Version: 6b16b94d7c51cbe5b1fa42aac98241d5
X-Inertia-Partial-Data: events
X-Inertia-Partial-Component: Events
RESPONSE
HTTP/1.1 200 OK
Content-Type: application/json
{
"component": "Events",
"props": {
"auth": {...}, // NOT included
"categories": [...], // NOT included
"events": [...], // included
"errors": {} // always included
},
"url": "/events/80",
"version": "c32b8e4965f418ad16eaebba1d4e960f"
}
```
[page object]: #the-page-object
---
---
url: /guide/title-and-meta.md
---
# Title & meta
Since Inertia powered JavaScript apps are rendered within the document ``, they are unable to render markup to the document ``, as it's outside of their scope. To help with this, Inertia ships with a `` component which can be used to set the page ``, `<meta>` tags, and other `<head>` elements.
> \[!NOTE]
> Since v3.10.0, Inertia Rails supports managing meta tags via Rails. This allows your meta tags to work with link preview services without setting up server-side rendering. Since this isn't a part of the Inertia.js core, it's documented in the [server driven meta tags cookbook](/cookbook/server-managed-meta-tags).
> \[!NOTE]
> The `<Head>` component will only replace `<head>` elements that are not in your server-side layout.
> \[!NOTE]
> The `<Head>` component is not available in the Svelte adapter, as Svelte already ships with its own `<svelte:head>` component.
## Head component
To add `<head>` elements to your page, use the `<Head>` component. Within this component, you can include the elements that you wish to add to the document `<head>`.
:::tabs key:frameworks
\== Vue
```vue
<script setup>
import { Head } from '@inertiajs/vue3'
</script>
<template>
<Head>
<title>Your page title
```
\== React
```jsx
import { Head } from '@inertiajs/react'
export default () => (
Your page title
)
```
\== Svelte 4|Svelte 5
```svelte
Your page title
```
> \[!NOTE]
> The `` component is provided by Svelte.
:::
Title shorthand
If you only need to add a `` to the document `<head>`, you may simply pass the title as a prop to the `<Head>` component.
:::tabs key:frameworks
\== Vue
```vue
<script setup>
import { Head } from '@inertiajs/vue3'
</script>
<template>
<Head title="Your page title" />
</template>
```
\== React
```jsx
import { Head } from '@inertiajs/react'
export default () => <Head title="Your page title" />
```
\== Svelte 4|Svelte 5
```js
// Not supported
```
:::
## Title callback
You can globally modify the page `<title>` using the title callback in the `createInertiaApp` setup method. Typically, this method is invoked in your application's main JavaScript file. A common use case for the title callback is automatically adding an app name before or after each page title.
```js
createInertiaApp({
title: (title) => `${title} - My App`,
// ...
})
```
After defining the title callback, the callback will automatically be invoked when you set a title using the `<Head>` component.
:::tabs key:frameworks
\== Vue
```vue
<script setup>
import { Head } from '@inertiajs/vue3'
</script>
<template>
<Head title="Home" />
</template>
```
\== React
```jsx
import { Head } from '@inertiajs/react'
export default () => <Head title="Home" />
```
\== Svelte 4|Svelte 5
```js
// Not supported
```
:::
Which, in this example, will result in the following `<title>` tag.
```html
<title>Home - My App
```
The `title` callback will also be invoked when you set the title using a `` tag within your `<Head>` component.
:::tabs key:frameworks
\== Vue
```vue
<script setup>
import { Head } from '@inertiajs/vue3'
</script>
<template>
<Head>
<title>Home
```
\== React
```jsx
import { Head } from '@inertiajs/react'
export default () => (
Home
)
```
\== Svelte 4|Svelte 5
```js
// Not supported
```
:::
# Multiple Head instances
It's possible to have multiple instances of the `` component throughout your application. For example, your layout can set some default `` elements, and then your individual pages can override those defaults.
:::tabs key:frameworks
\== Vue
```vue
My appAbout - My app
```
\== React
```jsx
// Layout.jsx
import { Head } from '@inertiajs/react'
export default () => (
My app
)
// About.jsx
import { Head } from '@inertiajs/react'
export default () => (
About - My app
)
```
\== Svelte 4|Svelte 5
```js
// Not supported
```
:::
Inertia will only ever render one `` tag; however, all other tags will be stacked since it's valid to have multiple instances of them. To avoid duplicate tags in your `<head>`, you can use the `head-key` property, which will make sure the tag is only rendered once. This is illustrated in the example above for the `<meta name="description">` tag.
The code example above will render the following HTML.
```html
<head>
<link rel="icon" type="image/svg+xml" href="/favicon.svg" />
<title>About - My app
```
### Head extension
When building a real application, it can sometimes be helpful to create a custom head component that extends Inertia's `` component. This gives you a place to set app-wide defaults, such as appending the app name to the page title.
:::tabs key:frameworks
\== Vue
```vue
```
\== React
```jsx
// AppHead.jsx
import { Head } from '@inertiajs/react'
export default ({ title, children }) => {
return (
{title ? `${title} - My App` : 'My App'}
{children}
)
}
```
\== Svelte 4|Svelte 5
```js
// Not supported
```
:::
Once you have created the custom component, you may simply start using the custom component in your pages.
:::tabs key:frameworks
\== Vue
```vue
```
\== React
```jsx
import AppHead from './AppHead'
export default () =>
```
\== Svelte 4|Svelte 5
```js
// Not supported
```
:::
---
---
url: /guide/upgrade-guide.md
---
# Upgrade guide for v2.0
## What's new
Inertia.js v2.0 is a huge step forward for Inertia! The core library has been completely rewritten to architecturally support asynchronous requests, enabling a whole set of new features, including:
* [Polling](/guide/polling)
* [Prefetching](/guide/prefetching)
* [Deferred props](/guide/deferred-props)
* [Infinite scrolling](/guide/merging-props)
* [Lazy loading data on scroll](/guide/load-when-visible)
Additionally, for security sensitive projects, Inertia now offers a [history encryption API](/guide/history-encryption), allowing you to clear page data from history state when logging out of an application.
## Upgrade dependencies
To upgrade to the Inertia.js v2.0 beta, first use npm to install the client-side adapter of your choice:
:::tabs key:frameworks
\== Vue
```vue
npm install @inertiajs/vue3@^2.0
```
\== React
```jsx
npm install @inertiajs/react@^2.0
```
\== Svelte 4|Svelte 5
```svelte
npm install @inertiajs/svelte@^2.0
```
:::
Next, use at least the 3.6 version of `inertia-rails`.
```ruby
gem 'inertia_rails', '~> 3.6'
```
## Breaking changes
While a significant release, Inertia.js v2.0 doesn't introduce many breaking changes. Here's a list of all the breaking changes:
### Dropped Vue 2 support
The Vue 2 adapter has been removed. Vue 2 reached End of Life on December 3, 2023, so this felt like it was time.
### Svelte adapter
* Dropped support for Svelte 3 as it reached End of Life on June 20, 2023.
* The `remember` helper has been renamed to `useRemember` to be consistent with other helpers.
* Updated `setup` callback in `inertia.js`. You need to pass `props` when initializing the `App` component. [See the updated guide](/guide/client-side-setup#initialize-the-inertia-app)
* The `setup` callback is now required in `ssr.js`. [See the updated guide](/guide/server-side-rendering#add-server-entry-point)
### Partial reloads are now async
Previously partial reloads in Inertia were synchronous, just like all Inertia requests. In v2.0, partial reloads are now asynchronous. Generally this is desirable, but if you were relying on these requests being synchronous, you may need to adjust your code.
---
---
url: /guide/validation.md
---
# Validation
## How it works
Handling server-side validation errors in Inertia works differently than a classic XHR-driven form that requires you to catch the validation errors from `422` responses and manually update the form's error state - because Inertia never receives `422` responses. Instead, Inertia operates much more like a standard full page form submission. Here's how:
First, you [submit your form using Inertia](/guide/forms.md). If there are server-side validation errors, you don't return those errors as a `422` JSON response. Instead, you redirect (server-side) the user back to the form page they were previously on, flashing the validation errors in the session.
```ruby
class UsersController < ApplicationController
def create
user = User.new(user_params)
if user.save
redirect_to users_url
else
redirect_to new_user_url, inertia: { errors: user.errors }
end
end
private
def user_params
params.require(:user).permit(:name, :email)
end
end
```
Next, any time these validation errors are present in the session, they automatically get shared with Inertia, making them available client-side as page props which you can display in your form. Since props are reactive, they are automatically shown when the form submission completes.
Finally, since Inertia apps never generate `422` responses, Inertia needs another way to determine if a response includes validation errors. To do this, Inertia checks the `page.props.errors` object for the existence of any errors. In the event that errors are present, the request's `onError()` callback will be called instead of the `onSuccess()` callback.
## Sharing errors
In order for your server-side validation errors to be available client-side, your server-side framework must share them via the `errors` prop. Inertia's Rails adapter do this automatically.
## Displaying errors
Since validation errors are made available client-side as page component props, you can conditionally display them based on their existence. Remember, when using Rails server adapter, the `errors` prop will automatically be available to your page.
:::tabs key:frameworks
\== Vue
```vue
```
> \[!NOTE]
> When using the Vue adapters, you may also access the errors via the `$page.props.errors` object.
\== React
```jsx
import { useState } from 'react'
import { router, usePage } from '@inertiajs/react'
export default function Edit() {
const { errors } = usePage().props
const [values, setValues] = useState({
first_name: null,
last_name: null,
email: null,
})
function handleChange(e) {
setValues((values) => ({
...values,
[e.target.id]: e.target.value,
}))
}
function handleSubmit(e) {
e.preventDefault()
router.post('/users', values)
}
return (
)
}
```
\== Svelte 4|Svelte 5
```svelte
```
:::
## Repopulating input
While handling errors in Inertia is similar to full page form submissions, Inertia offers even more benefits. In fact, you don't even need to manually repopulate old form input data.
When validation errors occur, the user is typically redirected back to the form page they were previously on. And, by default, Inertia automatically preserves the [component state](/guide/manual-visits.md#state-preservation) for `post`, `put`, `patch`, and `delete` requests. Therefore, all the old form input data remains exactly as it was when the user submitted the form.
So, the only work remaining is to display any validation errors using the `errors` prop.
## Error bags
> \[!NOTE]
> If you're using the [form helper](/guide/forms.md), it's not necessary to use error bags since validation errors are automatically scoped to the form object making the request.
For pages that have more than one form, it's possible to encounter conflicts when displaying validation errors if two forms share the same field names. For example, imagine a "create company" form and a "create user" form that both have a `name` field. Since both forms will be displaying the `page.props.errors.name` validation error, generating a validation error for the `name` field in either form will cause the error to appear in both forms.
To solve this issue, you can use "error bags". Error bags scope the validation errors returned from the server within a unique key specific to that form. Continuing with our example above, you might have a `createCompany` error bag for the first form and a `createUser` error bag for the second form.
:::tabs key:frameworks
\== Vue
```js
import { router } from '@inertiajs/vue3'
router.post('/companies', data, {
errorBag: 'createCompany',
})
router.post('/users', data, {
errorBag: 'createUser',
})
```
\== React
```jsx
import { router } from '@inertiajs/react'
router.post('/companies', data, {
errorBag: 'createCompany',
})
router.post('/users', data, {
errorBag: 'createUser',
})
```
\== Svelte 4|Svelte 5
```js
import { router } from '@inertiajs/svelte'
router.post('/companies', data, {
errorBag: 'createCompany',
})
router.post('/users', data, {
errorBag: 'createUser',
})
```
:::
Specifying an error bag will cause the validation errors to come back from the server within `page.props.errors.createCompany` and `page.props.errors.createUser`.
---
---
url: /guide/who-is-it-for.md
---
# Who is Inertia.js for?
Inertia was crafted for development teams and solo hackers who typically build server-side rendered applications using frameworks like Laravel, Ruby on Rails, or Django. You're used to creating controllers, retrieving data from the database (via an ORM), and rendering views.
But what happens when you want to replace your server-side rendered views with a modern, JavaScript-based single-page application frontend? The answer is always "you need to build an API". Because that's how modern SPAs are built.
This means building a REST or GraphQL API. It means figuring out authentication and authorization for that API. It means client-side state management. It means setting up a new Git repository. It means a more complicated deployment strategy. And this list goes on. It's a complete paradigm shift, and often a complete mess. We think there is a better way.
**Inertia empowers you to build a modern, JavaScript-based single-page application without the tiresome complexity.**
Inertia works just like a classic server-side rendered application. You create controllers, you get data from the database (via your ORM), and you render views. But, Inertia views are JavaScript page components written in React, Vue, or Svelte.
This means you get all the power of a client-side application and modern SPA experience, but you don't need to build an API. We think it's a breath of fresh air that will supercharge your productivity.